Multi-Search3
Showing posts with label Windows. Show all posts

About:about - Your Secret Tunnel To Tons Of Browser-related Information


We all know about "about:blank". Have you ever thought about "about:about"? I didn't, till recently. It's hard to believe, but this is how it happened! While on a search for finding something humorous about "about:blank", I stumbled on "about:about" and couldn't stop being amazed at how much browser-related information I missed all my life without knowing about it. There can be very few browser-related commands like "about:about". Type it in the address bar in every browser for the ultimate collection of any and every configurable and read-only browser-related parameter, a lot of which we may not find in regular Edit->Preferences. Once I knew about this obscure command, I ran it through the three browsers I have on my laptop and collected text and screenshots of the various options of this powerful command. Other than the Chrome, Firefox and Opera browsers you see in this article, I'm sure every other version of every other browser on every other operating system will have it's own unique implementation of this command.

1. OPERA-11.60 [Linux]


While Chrome and Firefox have links for the various about command options, Opera has only one pageful of important information. Just long static text with a few links but mostly read-only. Here's a quick look at a part of it.


Version information
Version 11.60
Build 1185
Platform Linux
System i686, 2.6.33.2

Browser identification
Opera/9.80 (X11; Linux i686; U; en) Presto/2.10.229 Version/11.60

Paths
Preferences /root/.opera/operaprefs.ini
Saved session /root/.opera/sessions/autopera.win
Bookmarks /root/.opera/bookmarks.adr
Opera directory /root/.opera
Cache /root/.opera/cache
Help documents /root/.opera/opcache
Mail directory /root/.opera/mail
Plug-in path /usr/lib/opera/plugins /usr/lib/mozilla/plugins
User CSS directory /root/.opera/styles/user

Third parties:
...

2. CHROMIUM-12.0 [Linux]

Chromium and Firefox present lists of links for various "about:about" options. One little thing that attracted my attention is that when you click on options such as  "about:flags" or type "about:flags" in the address bar, Chromium changes it to display "chrome://flags" etc. So, don't be alarmed to see this in the address bars of the four screenshots below. This happened only on Chromium and not on Firefox.

  • About:flags [Experiments such as for print preview and multiple profiles that can be enabled. Users are strictly warned to proceed at their own risk due to the experimental nature of these options].


  • About:memory [I found this to be very interesting. Displays memory allocated to every tab open. I was surprised to find that the summary on top displays memory used not just by the Chromium browser but also other currently-running browsers. [Opera and Firefox  you see that I had running].
 
  • About:plugins [Another location to enable/disable plugins other than from Wrench(Settings)->Preferences->Under the hood->Content settings->Plugins->Enable/disable individual plugins].


  • About:version [Remember to grab the command line equivalent of however you started Chromium from here for use in your shell scripts].

Some other options I found interesting that are not displayed with images as above:
  • About:view-http-cache [Displays cache contents]
  • About:credits [Displays webpage and licence links]
  • About:dns
  • About:histograms
  • About:net-internals

3. FIREFOX-13.0 [Linux]

Firefox 13.0 has the highest number of about:about options, a whopping 25! Chromium 12.0 has 18 clickable and 6 non-clickable options. [The non-clickable ones are for debugging only, you have to type them into the address bar every time].


  • About:addons [Configurable addons manager to download addons on demand. This panel also has tabs for extentions, themes and plugins].
  • About:cache [Displays disk and offline cache device locations and content].
  • About:config [Change internal defaults at your own risk. Click twice to change or rightclick for more options. Has so many obscure options that this could be the theme of a whole new article!].

  • About:home [Main dashboard. Start here].

  • About:permissions [Permissions manager for mozilla and all sites. Manage permissions for passwords, cookies, popups, share location and offline storage].


  • About:memory [You can view a neatly-presented memory allocation map for Firefox processes in a tree view].


Some other options not displayed with images as above:

About:plugins [Plugin-related information]
About:buildconfig [Machine/platform/tools builds and versions]

FINAL WORD

Browsers, there are a million but "About:about", there is only one. You don't have to be a digital ninja to try the experimental or debugging options of this command. Everyone can try "about:about" in every browser and start reaping the benefits of read-only and configurable browser parameters! Back to my search for something humorous about "about:blank". At this time, the only funny thing that comes to my mind is to say "He is the inventor of 'about:blank'" about every half-baked, pompous type around! If you find anything funnier, let me know at sqlhtm@sqlhtm.com.


Rescue Your Trapped Cell Phone Image! Use An Upload Script!

Image Credit:it.wikipedia.org.
 
Problem

You once had a Windows(XP+) pc/laptop and used the Nokia PC Suite [Windows only] to manage transfer of your files, images, contacts etc between your cell phone and the outside world. And then your hard disk crashed and took the Nokia software with it. Until the disk repair/replacement and/or new pc/laptop purchase you decided to take the Linux route to digital survival. You miss a lot of your comfort programs, your tried-and-tested shortcuts and routines but you've learned to accept life, one live-cd startup/shutdown at a time. Thank goodness you have fairly decent, if not better, replacements for any and every Windows tool from open source  on your Linux pc, but there still are some sore points, the Nokia PC Suite, for example. It is Windows-only which means files and images on  your cell phone are literally locked out if you are on Linux! And when your pretty niece comes calling about the birthday photo you took on your cell phone a few months ago, you're stuck.

Solution
[*See Note Below]

Not to worry. There's  a way out! With a mobile browser like UCBrowser and an upload script like file-upload.php you can solve your problem easily!

Just make sure that you have access to a web hosting account with cpanel or similar tools.

Then download and install a file upload script from the internet [I used the file-upload.php (file upload form) script from zubrag.com]. There may be others like it if you can't use this for some reason.

Now change the parameters in the script to point to your server:
    1. destination folder
    2. max file size
    3. success url
If you don't use mysql database, you can comment out
  • the 4 db parameters
    1. db_host
    2. db_database
    3. db_username
    4. db_password
  • the table creation part
  • and the
  • The lines between
    # if (DO_LOG) {
    and # // if (DO_LOG)
Start your mobile browser [I used UCBrowser-an amazing, feature-filled mobile browser] and type www.yourservername.com/file-upload.php to bring up the file upload page with file name input.

First press the [Browse] button to select the image from the cell phone [E:\images\...\yourimage.jpg], and press the [Upload] button to upload it to your server.

That's all! Unless you have errors you should have your cell phone image now on your server from where you can download it to your pc/laptop or upload it to blogger, flicker etc.

In Short

Nokia Pc Suite is a Windows only software. While on Linux you can use a file upload script to transfer your images or files from your Nokia N73 or similar cell phone to your Linux pc/laptop or to other websites like blogger, flicker etc.

Note

Keep this route to file transfer as a last resort. The other 2 options might be easier if you can get them to work instead.

  1. Mass Storage Mode: Use Mass Storage Mode from                                     [Settings]Menu--->Tools--->Data Cbl
  2. Card Reader: Simply pull out the mini SD card and connect to it your pc/laptop from your card reader

File-upload.php Gets It Done


Real-Life Example

Proof of the pudding is in the eating. Here is how I used this method in a real-life situation. CLICK HERE to see an image of the century[12/12/12 12:12:12-image on the left] that was trapped and rescued using the approach described in this article!

Daily Dose Of Bible - Download DBR-2013. Free!

[excerpts from the DBR-2013 readme]

DailyBibleReader-2013. FREE!

Requirements

Linux or Windows [Chrome or Opera].
However, it should work in ALL WINDOWS AND LINUX browsers as is or with minimum modifications.
IE users, please enable activex first!

Help

  • Press [Home] to begin. Also press [HOME] after you have finished reading to let the animated Bible verse images play.
  • Press [Today's Text] to read today's passages. The first time you click, it may take a while to load.
  • Press [Random Date] repeatedly to read as many random dates as you like. The first click may take a while.
  • Press [Read Bible-BBE] to read from any book from the old and new testaments of the Bible[BBE-Bible in Basic English].
  • Press [Slide Show] to run through 80+ Bible verse images.
  • Press [Read Me] for help and instructions.
  • Press [Sqlhtm.com] to visit sqlhtm.com-home of more than 24+ free tools. Remember to look at the quick view for a one-page view of everything important about sqlhtm.com and the blog.
  • Use the [up], [down], [pgup] and [pgdown] arrows to move around.

Reading The Bible

Probably the best way to introduce the DBR-2013 would be to refer to the introductory words of the ccmorrishills.org reading plan. Short and sweet, better than anything I might have said myself!

"...Isaiah 55:11 tells us that it will never return void. King David proclaimed that he had hidden it in his heart.Revelation tells us that we are blessed simply because we read it. Jesus revealed that it was HE. What is it? The very Word of God!..."

SlideShow

I created the images used in the slide show with Font3dTemplates-an online 3d html wordart creator I wrote in November-December of 2011. This chrome-on-XP-or-newer app helps you create headers, banners, cards, flyers etc with regular or symbol fonts. A newer version in the future will include support for floral and other image fonts to make it more powerful and compelling. Give it a try and send your creations to sqlhtm@sqlhtm.com to share them with others!

Licence

DailyBibleReader-2013 is free for your personal use. Please credit sqlhtm.com and the author for everything other than your personal use.

Download at Sqlhtm.com

Don't forget to visit Sqlhtm.com for this and 24+ web, 3d font, database and windows scripts and tools - Free!

Type Tamil Jokes For Website In Puppy Lucid Linux 510


Create Tamil Text Images With Charming Bamini For Your Websites.

When you are dealing with non-English websites, articles and text it is often impossible to get 100% of your target audience to be able to read your content  because of the multitude of operating systems and browsers that may not support your language font. Even if those websites let you download fonts on their websites, they may not work in all operating systems - case in point - Tamil fonts for Windows. Try as hard as you can, these won't display properly in Linux.

Even though things are changing, and new fonts and tools are being created and offered for download, most of the Tamil transliteration tools work only in Windows so how do you get around this problem?

Recently I had a Tamil joke to display on my website on this page but I wanted to make sure that all Tamil viewers from all browsers and operating systems are able to view it without font issues. While there could be a whole bunch of ways to get this done,  this is what I needed to do.

1.Download and install baamini.ttf font [ie. copy baamini.ttf to /usr/share/fonts/default/TTF, open/restart Geany editor and select Baamini font from Menu-View-Change Fonts].

2.Go to [http://www.bibleintamil.com/startingconverter.htm],  select Unicode to Baamini and type Tamil text in English. The top text area is where you type or paste your text. As you type, the Unicode text on top changes into Baamini text in the bottom box [Works for sure in Chrome and Opera-should work in other browsers too].

3.Press the "Copy Baamini Text" button to copy the text from the lower box and paste it into the Geany editor after selecting the Baamini font to view the text in Tamil. 

4.Make a screenshot with mtPaint screen capture, crop and border, then using mtPaint or a similar image editor, save the image as a jpg or gif for use as image in websites or blogs(reliable for web).


Download The Daily Bible Reader-2012!

Daily Bible Reader 2012
Image Credit: http://en.wikipedia.org/wiki/File:Holy_bible.jpg.


Here is a little meditative medication for your every day ailments - The Daily Bible Reader2012!

It has 

  • a daily text reader button
  • a random reader button
  • a little slide show of bible verses created with Font3dTemplates
  • a Bible reader with all Old and New Testament books
  • a clickable calendar year-spread 


Download DBR2012 now! 
Make your everyday burden of life just a bit more bearable!

Light And Dark, Gradients Rock!

Create Crystal Clear Saturn & A Bull's Eye But Blur When Needed With Photofiltre Gradients.

Image editors and viewers, there are many but every one of them is so unique! What feature of every tool you will discover at a particular point in time is so hard to predict but sometimes you are just so delighted to see the results of your experiments with shapes, colors and techniques. Let me mention Phoxo, an excellent tiny image editor I used a long time ago to create tons of gradients. You can take a look at gradientsquare, a one-page view of 47 gradients, download  all of them in a zip file here at Download From Sqlhtm.com. Go grab it while it's still there. I must also list a longtime favorite, simple yet powerful  image viewer, Irfanview, which is fortified with lots of plugins to expand its versatility. But I am really going to describe how I used  two of Photofiltre's numerous features here. Gradients and blur are so simple and easy to use but they have the power to bring our images and pictures to life with even basic manuvres.  You may click on every image  for a bigger view.

I.Three steps to Saturn

jer-alternate-saturn-gradients8 jer-alternate-saturn-gradients7 

Call it the "Belly Dancer", the "Ringed Thing" or the "Hard-hatted Beauty", Saturn is photogenic from any angle. The distant Sombrero galaxy may be the best looking heavenly object I have seen so far, but our own ringed beauty Saturn is cool in its own simplicity. While you can't get anywhere close to it anytime soon, you can still capture its good looks easily with gradients.

Step l: The background

Saturn-Background
  • Start Photofiltre.
  • Click [File]-[New] from top menu or press [CTR-N] to start a new image.
  • Select a high resolution[eg.1600x1200] from the list of preset sizes. The advantage here is that, while you start with a high definition image now, you can convert/resize it later as needed. Leave others to default and press [Ok].
  • Maximize the window and click on the second icon from the extreme right on the top row of the top menu to auto zoom your image.
  • Click on the sixth icon from the second row of the top menu on the extreme right to select [gradients].
  • Select [duotone] under [style], [top to bottom] under [direction].
  • Select a favorite color (I chose dark blue) under [color1], set [opacity] to 100%.
  • Select [white] under [color2], set [opacity] to 100%. Press [preview] to check, [Ok] to confirm.

Step 2: Saturn itself

Saturn-Body
  • Click on the arrow [selection tool] on the right panel and then select the [ellipse] icon.
  • Click and drag around the center of the image to create a 3" to 6" circle .
  • Click on [Selection] from the top menu, select [Center] and then select [Image center].
  • Click on the [Gradient] button, select [Bottom-to-top], press [Ok] and press escape.


Step 3: The ring thing

Saturn-Ring
  • Click on the arrow [Selection tool] and then click on the [Ellipse] icon from the shape icons.
  • Just below the middle of the screen, click just outside the left edge of the image, drag straight to just outside the right edge to make an ellipse about 2-third to 3-thirds of an inch.[The thinner the ring, the easier to create. Larger rings might require a little copy/paste].
  • Click on the [Gradient] button, select [Top-to-bottom], press [Ok] and press escape.
I like my Saturn, how do you like yours? Click on mine for a bigger view.


II.Mercurial Magnificence[aka Bull's Eye]

jer-alternate-circle-gradients1 jer-alternate-diam-gradients5 jer-alternate-ellipse-gradients3

I used Photofiltre 6.5.2 to create the samples for this article but read on and see how you can test these with your own favorite image editor,  or, why don't you just download and try this wonderful image editor itself? Gradients simplistically used may be boring but alternate them and see the magic. Click on the sample images above to check this out for yourself. Let's go ahead and create the first one for ourselves, a little bull's eye so smooth you can stare at it for a long time.

Step l:

BullsEye1.jpg
  • Start Photofiltre.
  • Click [File]-[New] from top menu or press [CTRL-N] to start a new image.
  • Select a high resolution[eg.1600x1200] from the list of preset sizes. The advantage here is that, while you start with a high definition image now, you can convert/resize it later as needed. Maximize the window and click on the second icon[Maximize] from the extreme right on the top row of the top icons to auto zoom your image.
  • Click on the sixth icon from the second row of the top icons on the extreme right to select [Gradient].
  • Select [Duotone] under [Style], [Top to bottom] under [Direction].
  • Select a favorite color (I chose dark blue) under [Color1], set [Opacity] to 100%.
  • Select [White] under [Color2], set [Opacity] to 100%.
  • Use [Preview] at any time to view changes, and press [Ok] to exit.

Step 2:

BullsEye2.jpg
  • Click on the arrow[Selection tool] from the middle group of icons, and select [Ellipse] from the bottom group. Click and drag to make a big circle around the center of the image. Press [Selection] from the top menu, then press [Center] and then press [Image center].
  • Press [Gradient] button again, select [Bottom to top] this time and select [Ok] and press escape.

Step 3:

BullsEye3.jpg
  • Click on the arrow[Selection tool] from the middle group of icons, and select [Ellipse] from the bottom group. Click and drag, about half-an-inch inside of the first circle, to make a smaller circle around the center of the image. Press [Selection] from the top menu, then press [Center] and then press [Image center].
  • Press [Gradient] button again, select [Top to bottom] this time and select [[Ok] and press escape.

Step 4:

BullsEye4.jpg
  • Repeat [step 3] as many times as you like, one for each circle, just make sure to alternate the direction of the gradient.


I stopped with two more, you can go on until you're happy with your own bull's eye/speaker box/mercury bowl or whatever else you want to call it.

BullsEye5.jpg


III.Easy blur for background images

easy-smudge4.jpg jer-abstract-gauss-seethru-heading-tat jer-abstract-gss21.jpg

One of my favorite blogspot themes has a zoomed out background picture. I suddenly found an easy way to create a similar effect with Photofiltre. It's so powerful it's uses can be countless.

Step l: The background

easy-smudge1
  • Start Photofiltre.
  • Click [File]-[New] from top menu or press [CTRL-N] to start a new image.
  • Select a high resolution[eg.1600x1200] from the list of preset sizes. The advantage here is that, while you start with a high definition image now, you can convert/resize it later as needed. Leave others to default and press [Ok].
  • Maximize the window and click on the second icon from the extreme right on the top row of the top menu to auto zoom your image.
  • Select the bucket [Fill tool] from the right panel, select the flouracent green color from the color-palette and fill the canvas with it.

Step 2: The spray effect

easy-smudge2
  • Press the [Spray tool] from the right panel, set [Pressure] and [Dispersion] to maximum and set the [Radius] to maximum[300].
  • Select bright red from the color palette and gently spray until you get an even spread for the most part. Repeat with one or more different colors.

Step 3: The Gaussian clout

easy-smudge3
  • Select [Filter] from top menu, then [Visual effect] and select [Gaussian blur]. Set [Radius] to maximum[30pixels], press [Preview] and change as needed and press [Ok]. I am sure you are as happy as I am at the results of the zoomed out background. Now let us create the text we want to display.


Step 4: The heading or text

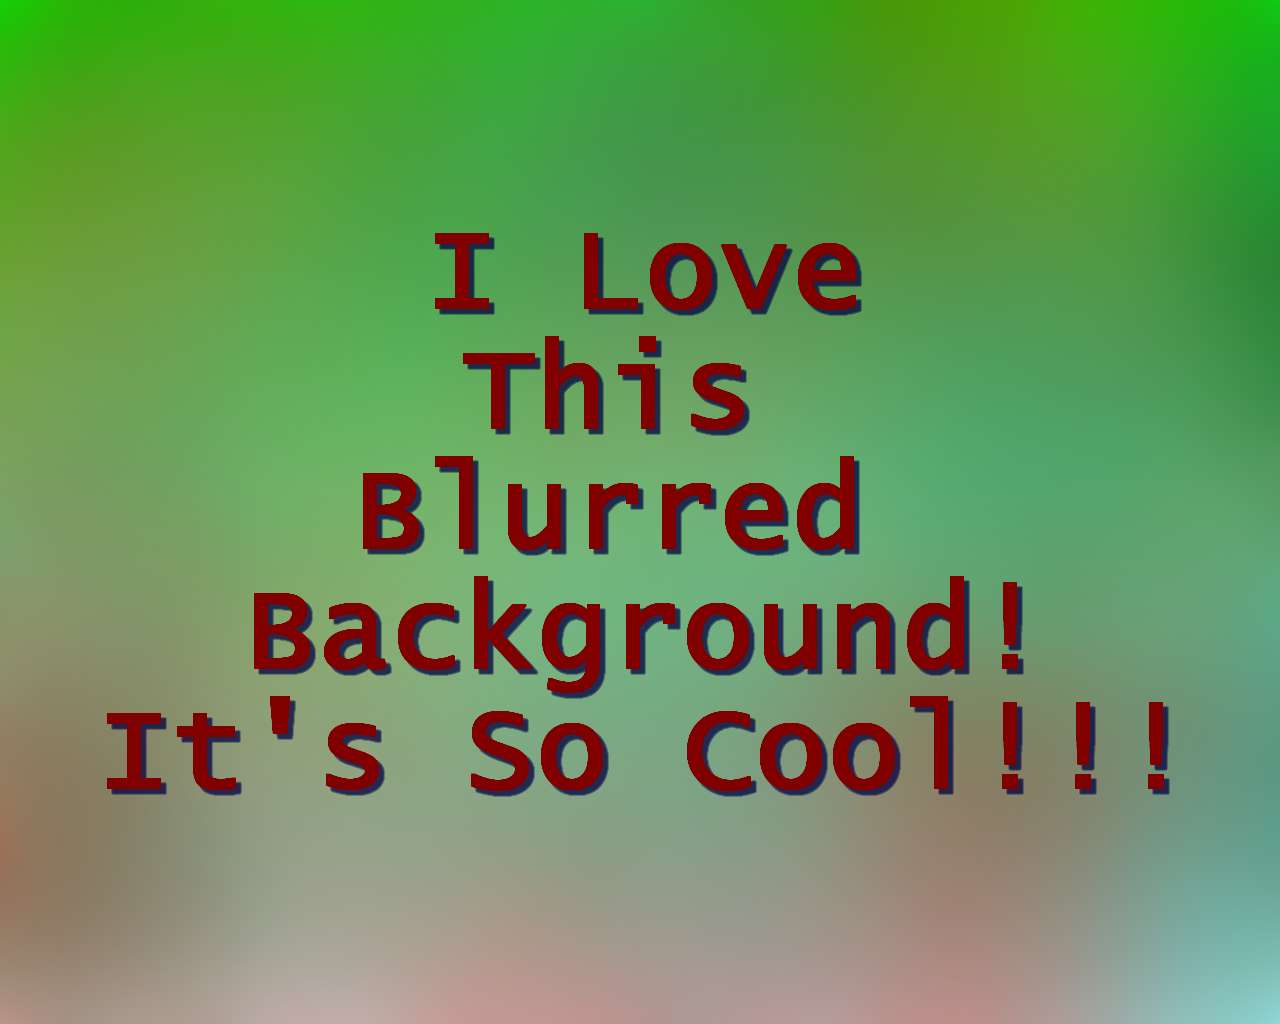
easy-smudge4
  • Press the [T]  icon from the top icon row and set the [font size] to 90.
  • Select your favorite font, set style to [Bold], select your favorite color, align center if you like and type your heading or text.
  • Under the same [Text] window select the [Effects] panel and try [Opacity] at 100%, [Drop shadow] at [x=5], [y=5], select a dark color[Dark Blue] and press [Ok].
  • Select [Selection] from top menu, then [Center] and then [Image center].
Change these values to your taste till the result looks good to you. Don't forget to try the [Negative mode] check box which makes an interesting effect too! Don't think you are restricted to this manual method for using the Gaussian filter. An equally great or better way might be to use other suitable photographs, especially nature photos as base material. If you want to reduce the file size, use [tools]-[preferences] to configure compression for jpeg images, which I think gave me the smallest size compared to other formats.


Download:

You may download images used in this article from HERE

Check out these links:

1.Photofiltre: The official site
2.Phoxo:
3.JcWhat's 47 Gradients zip file download
4.JcWhat's BullsEye Gradient technique image bundle

New Images - Font3DTemplates Update

Some More Wordart-click on image
This one first!

Here is an update to the Font3dTemplates [F3dt] online wordart generator but first check out this link for new additions to the Font3dTemplates Slide show.

Ding-Ding: Wingdings and Webdings - Put life into your wordart!

Do you think it's hard to create simple but beautiful cards and wordart with clipart images that come with XP+ built-in fonts only? Far from it. Take webdings and wingdings - fonts that come preinstalled with Windows. There is a lot you can do with them. At bigger sizes, colored and 3D-shaded, they are absolutely beautiful! The same applies to any good font. It's true they are not photograph-quality but they sure can put life into your wordart and I think any fair-minded artistic person would grant that the possibilities for creating an endless variety of colorful lively artwork are there for everyone. Just choose bigger font-sizes, color them up and increase the linesizes for the 3D effect - you've got yourself a solid foundation to build on!

Thanks - Part I: Open source, Puppy Linux and Bible Quotes

I intend to add more samples to the samples section of F3dt very soon but I am not sure how long it will take. Font3dTemplates requires chrome on XP+ but I don't have windows on my laptop now, only Puppy - Puppy Lucid 510. I have been living on Puppy Lucid live CD's, some of them remastered, for the past several months. It gives me most of what I need on a daily basis, it's really hard to believe what you could do with a live CD such as this one! Really amazing! I just can't applaud and appreciate enough the open source community in general, and Puppy Linux in particular for their hard work and giving that enriches the lives of others. 

By the way, the Bible quotes I used in F3dt come from an excellent site on the net  with lots of Bible quotes. It was a long time ago but I thank them sincerely for collecting and sharing excellent Bible verses with everyone! Let me also include the sites on the net with helpful reference material and problem resolutions - my sincere thanks to each and every one of them!

Thanks - Part II: The Picasa connection

Just remembered something. A long while ago, I think it must be before the end of 2005 when I was on the lookout for my next job, I was playing with some screensaver creators and ended up with a bunch of cards and slides that displayed Bible quotes. I wish I had access to better images but I had to make do with a few  free images including some that came with windows. I don't remember the name of the screensaver creator - I will defenitely mention it later if I remember it - but I thought those images were nice too! These images still live at picasa.com. I used a slideshow gadget to create a slideshow for my blog out of these. I love picasa.com as a medium for storing, editing and sharing images especially this blog's images. It has grown admirably over the years and here is something else I have to thank Picasa for: Slides are nothing new and I have loved the Polaroid pictures right from the 80s but the slide creator button you see in F3dt was inspired by Picasa! 


Future Plans: Artistic Fonts and User-Images

The first future update plan for F3dt would be to use custom-made artistic/floral/fancy fonts. Remember the "Famous People" font from Font3dRandom? There are a bunch of these fancy art-related fonts for download on the net.

The second plan is to make user images as backgrounds optionally. I had once tested some versions of F3dt along these lines but have not found a way to integrate them into F3dt yet.


Spare & Share: Your creations are welcome!

Spare a minute, share your wordart. Get going! Create and submit your Font3dTemplate slide/card/wordart to sqlhtm@sqlhtm.com. The funnier and memorable - the better! You can find them later on display at the user-submissions section of the slideshow at sqlhtm.com.*
*Sqlhtm.com reserves the right to display only acceptable and appropriate wordart

Browse The Web, Browse Your Folders Too-Browser Versatility

Browser As Folder Viewer
Basic stuff, don't complain if you already use this everyday.

BrowserAsFolderViewer
Viewing files from folder display on Chrome[Puppy Linux].
When you need to browse and view a bunch of html files in the folders on your pc, you click or double-click on a file to open it in the browser, say chrome,  and then close the tab or window to close it and repeat this over and over.

If you have a file manager which is capable of two-panel file preview, this should be a breeze but if you don't, then I think it is annoying to have to use the file explorer and the browser also.

So instead of clicking on every file in the file explorer one after the other to view it  on the browser and closing it, you can open the folder itself in the browser, click to open files and right-click and press [back]  to go back to select the next one in one breath. This saves you from having to switch between the file explorer and the browser for every file, definitely harder. With the folder display on the browser, you could also try and see if zooming out with Ctrl- [eg.Chrome] helps.

While most of the browsers should allow you to open folders/directories so you can view html and image files, some may not!

Browse the web, browse your folders, email, chat or tweet about why "chill"ies are "hot", just don't try to teach your browser to breath deeply!


Font3dTemplates: Top 7 Reasons Why I Shouldn't Let YOU PREVIEW


7.You start yelling fi before I type my if. (That too, in Javascript)
6.You think evil is better compared to eval.
5.You are so nerdy you think the HOME button is scary.
4.You have the dirty habit of typing curse words in input boxes.
3.You look for dingdong font instead of wingdings.
2.You have the uncontrollable urge to look at the about box to see if I gave you credit for no reason.
1.You have the evil habit of starting my Xp-Chrome app with IE and every other browser just to see how crappy everything can be.


Create Headers,banners,Anything. Font3dTemplates. Coming Soon.
View Samples SlideShow


Easy Bookmarks-Font3dTemplates. Coming Soon.


Create Bookmarks Easily With Font3dTemplates. Coming Soon!
View Samples SlideShow

Coming Soon.Font3dTemplates

Click on image(don't bang on the image on the left-open the post first!) to view samples.
Create headers, banners, posters, wordart & designs easily. Font3d Templates. Coming soon.
View Samples SlideShow

One Picture - One Thousand Words

Tired looking for that program on the XP-Start menu? Make the program's icon the folder's too - and find things quickly!


After-Folders Have Unique Icons

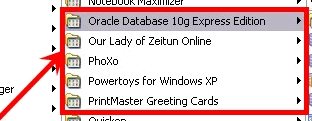
Before-Folders Have Same Icon


When I install new programs on my laptop, I let the installer group them together under the program's folder in the Start Menu. What I end up with is column after column of program folders in the Start Menu with the same folder icon that makes locating a program I need a nightmare. So for some often-used programs, I decided to replace the windows folder icon with the program's icon. 


Step 1: Copy the program's icon from Start Menu:


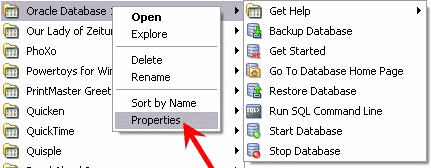
First I opened the Start Menu folder of the program, right-clicked on the program's icon and then chose properties.


Then I opened the shortcut tab and clicked on the change icon button at the bottom and copied the desired icon's shortcut from the next window. Remember there can be more than one icon for a menu item.


Step 2: Replace the folder's icon with the program's:


I right-clicked on the program folder again from Start Menu-All Programs. Then I chose properties.


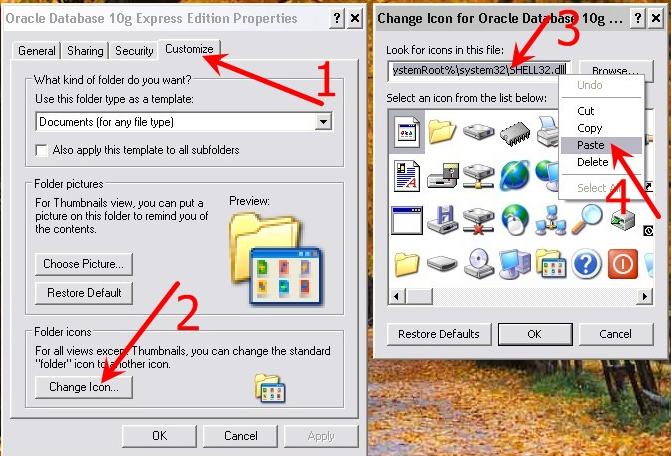
I clicked on the customize tab on top and then clicked on the change icon button at the bottom.
Now I pasted the icon's shortcut as seen the picture on the right below.


So I now have the folder with the desired program's icon. And it is much better than the "can't-tell-what's-inside-without-straining" old windows folder icon.


One

more...


I am getting older by the minute and I wonder who lived the longest. Was it Enoch? I have to confirm using the awesome Bible program which has the fastest search in the world, in my view, till now. BerBible seems to have the results ready even before I finished typing my search query. It's that fast! One look at the folder icons and I've found my green cross icon. 


Got it already! By the way, if you thought it was Enoch, think again. Methuselah is the correct answer. Check out how many years he lived, please do, I am not telling you!

Enhanced by Zemanta

BlogCollage


Blog Collage - Top Random Posts In No Particular Order

Mouseover the images for title and comments