


Linux[Zorin7 OS] Power Tip - Make The Start Menu And Task Bar Truly Yours
 11/02/2014 03:54:00 AM
 Jsc Jwhat Jerome Christopher
, Posted in
Linux
,
Shell Scripts
,
Tips'nTricks
Jsc Jwhat Jerome Christopher
, Posted in
Linux
,
Shell Scripts
,
Tips'nTricks


If you're like most people, you just use your pc/laptop as you bought it - with no snooping, no messing around - use it just the way it is. Why fix stuff if it isn't broken in the first place, right? While this policy may be best-suited for most end-users, it may not be good enough for the adventurous few, especially the geeky programmers, developers etc. They tend to take everything apart, whether or not they can put them back together. Adding user programs and scripts to the Start Menu was beyond most people's reach not too long ago. Why bother when you can create shortcuts on the desktop? Not any more. Zorin7 OS [Ubuntu] comes with a program called [Main Menu] you can start from [Start Menu->Accessories] that helps us add our programs and scripts to the Start Menu. It also has an applet on the task bar [Application launch bar settings] to add stuff to the task bar. You can start this by rightclicking on an icon in the task bar on the LHS, to the right of the [Start Menu] icon.
We are going to accomplish four things in this exercise
A. Create the oneliner shell script for our random dictionary lookup
First create a folder such as /home/jwhat1/Tools/LDWords, create a new file[LookupDictWords.sh] and save the code below in that file within that folder (You can use a GUI editor such as Geany or Leafpad or you can use terminal editors such as Vi or Emacs or Nano to create/edit a text file in Linux).
Download script
B. Open up a terminal and change the file to executable.
Instead of running the command above from a terminal, you could also locate it on PCManFM file manager, rightclick on this file, select [properties], and set [view content] and [execute] to [anyone] and [change content] to [only owner and group] on the [permissions] tab.
C. Associate this file to be run by /bin/bash.
Rightclick on this file, select [Open With], click on [Custom Command Line] tab and enter [/bin/bash] in the [Command Line To Execute] input box, and click [OK].
D. Run the script
I.From the commandline on a terminal
Type
$bash LookupDictWords.sh
II.With PCManFM GUI file manager
1.Rightclick on LookupDictWords.sh and select [/bin/bash] to run it.
2.Doubleclick on it and when you see [Execute file] dialog box, click on [Open] to run it.

Yes! It works!(Click on image above for bigger view)
So we have completed the first step of creating the file. Now let us see what we need to do to put it in the Start Menu.
 1.First bring up [Main Menu] from [Start Menu->Accessories->Main Menu]. (Click on image above for bigger view)
 2.Open the [New Menu] input box from [Main Menu->New Menu] and type the name of the menu/program group and a comment.
Click on the icon on the top left on the input box to select an icon for our new program group if you wish.(Click on image above for bigger view)
2.Open the [New Menu] input box from [Main Menu->New Menu] and type the name of the menu/program group and a comment.
Click on the icon on the top left on the input box to select an icon for our new program group if you wish.(Click on image above for bigger view)
 Do you see the new Main Menu group we just created on top left? (Click on image above for bigger view)
 3.Now, create a new menu item
 Make sure to confirm the new menu item we just created(It's in the middle right on top). (Click on image above for bigger view)
 4.Click on [Start Menu->LDWords->LookupDictWords.sh] to run our new script! Did you see the random word lookup results on your browser? I did. We have successfully accomplished the first half of our goal - configuring the Main Menu to display our script! (Click on image above for bigger view)
 Before and after images of the Start Menu. Do you see the menu group[LDWords] and menu item[LookupDictWords.sh] we just created in the Start Menu? Good! (Click on image above for bigger view)
1.Rightclick on an icon in the taskbar on the LHS to the right of the [Start Menu] and select [Application Launch Bar Settings] to
bring up the [Application Launch Bar]. (Click on image above for bigger view)
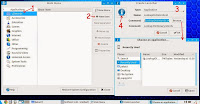
 2.Click on the [Arrow] to expand the [LDWords] group on the RHS and select the [LookupDictWords.sh] script. (Click on image above for bigger view)
 3.Now click on the [+Add] button in the middle of the box to add the script to [Applications] on the LHS. Use the [Up] and [Down] buttons in the middle to move program icons on the task bar to the left or right. (Click on image above for bigger view)
 4.Can you now see our script on the taskbar on the LHS to the right of the Start Menu?
Click on it to run the script. (Click on image above for bigger view)
4.Can you now see our script on the taskbar on the LHS to the right of the Start Menu?
Click on it to run the script. (Click on image above for bigger view)
 Yes! It works! We've got the results displayed on the browser automatically! (Click on image above for bigger view)
From now on, whenever you are thirsty for learning words or just bored, click on our icon on the taskbar to look up a random word! Just wait till you see the results on the browser before clicking again because clicking fast might return unpredictable results.
 Before and after images of the task bar . Do you see the icon for LookupDictWords.sh in the task bar? Good! (Click on image above for bigger view)
Here's a bigger and better script that
Step 4A. Back up the random word script above(For when you want to use the random script above seperately).
$cp LookupDictWords.sh LookupDictWords.sh.random
Step 4B. Open LookupDictWords.sh. Select all code, delete it. Now copy the code from the box below, paste it to the LookupDictWords.sh file and save.
Step 4C. Click on the task bar icon for LookupDictWords.sh script to start.
FOR USER INPUT
Enter your word and press [OK] for user word lookup or
FOR RANDOM WORD
Leave input empty and press [OK] for random word lookup or
TO EXIT
Press [Escape] key or click on [CANCEL] to exit.

 If you like this bigger script, leave it as it is. If you are lazy or if you want no input box annoyance, use the code we saved and backup this for later use instead.
REQUIREMENTS
Zorin7 OS and a browser(I used Chrome 28).
Zenity(I used version 3.6.0).
ADD SCRIPT TO MAIN MENU FIRST
User programs and scripts need to be added to the Start Menu first before you can add them to the task bar.
DEBUGGING
First open a terminal, go to /tmp directory and run one or more of the following commands to debug.
cd /tmp;
If the browser won't start, make sure you can start your browser manually by typing at the command prompt
$chrome
or
$firefox
etc. Use
$which chrome
or
$which firefox
etc to get the path and insert it in the script if needed.
You may also use the commands below.
ls -l dicx.htm [See if output file exists]
cat dicx.htm [View contents of output file]
ps -ef|grep LookupDictWords.sh [Use this to see if the script is running and possibly remove it with the [kill -9 pid] command if needed]
CLICK-AND-WAIT
Click gently on the LookupDictWords.sh icon on the task bar, and WAIT for the browser to come back with the results BEFORE CLICKING AGAIN. Fast and furious clicking may cause unpredictable results.
Random number selection logic in the oneliner: Advanced Bash-Scripting Guide[MC]
How do you like what we have done so far? Starting our favorite programs from the task bar is like flying. Hunting for them everytime all over is like crawling on all fours. Which one do you think is better? The first one, of course! I know where you are headed - to create a shortcut for your favorite oneliner from two great places on the web HERE or HERE, aren't you?
Remember to visit sqlhtm.com for the latest tweet/Bible verse viewer "Polar Verses" and more tools!
We are going to accomplish four things in this exercise
- We'll create a oneliner shell script that digs up a random word, looks it up on the dictionary and lets you view the results from your browser.
- We'll describe the steps to add it to the Zorin7 OS startup menu.
- We'll describe the steps to add it to the Zorin7 OS taskbar with an icon for a one-click word lookup anytime.
- We'll conclude everything with a bigger and better script that includes both the random word lookup on step1 above(no user input) and ALSO a user-word lookup(optional user input).
STEP 1: CREATE THE ONELINER SHELL SCRIPT FOR RANDOM WORD LOOKUP
First create a folder such as /home/jwhat1/Tools/LDWords, create a new file[LookupDictWords.sh] and save the code below in that file within that folder (You can use a GUI editor such as Geany or Leafpad or you can use terminal editors such as Vi or Emacs or Nano to create/edit a text file in Linux).
Download script
B. Open up a terminal and change the file to executable.
Instead of running the command above from a terminal, you could also locate it on PCManFM file manager, rightclick on this file, select [properties], and set [view content] and [execute] to [anyone] and [change content] to [only owner and group] on the [permissions] tab.
C. Associate this file to be run by /bin/bash.
Rightclick on this file, select [Open With], click on [Custom Command Line] tab and enter [/bin/bash] in the [Command Line To Execute] input box, and click [OK].
D. Run the script
I.From the commandline on a terminal
Type
$bash LookupDictWords.sh
II.With PCManFM GUI file manager
1.Rightclick on LookupDictWords.sh and select [/bin/bash] to run it.
2.Doubleclick on it and when you see [Execute file] dialog box, click on [Open] to run it.

Yes! It works!(Click on image above for bigger view)
STEP 2: ADD THE SCRIPT TO THE ZORIN7 OS START MENU


- [IMPORTANT] Click FIRST on the new menu group we created on top left.
- Click on [New Item] button on the right.
- Now enter a name. Use the [Browse] button to select the script or enter it manually. Type a comment if you want.
- Click on the icon on the top left of the input box to select an icon for our new program if you want. (Click on image above for bigger view)


STEP 3: DISPLAY THE SCRIPT ON THE ZORIN TASKBAR


From now on, whenever you are thirsty for learning words or just bored, click on our icon on the taskbar to look up a random word! Just wait till you see the results on the browser before clicking again because clicking fast might return unpredictable results.

STEP 4: USE THE BIGGER AND BETTER SCRIPT [Includes BOTH User Word Lookup & Random Word Lookup]
- Lets you lookup YOUR OWN WORD on the dictionary
- Comes up with a random word if you leave the input box empty and press [OK]
- Above all, looks much better than the random script output!
Step 4A. Back up the random word script above(For when you want to use the random script above seperately).
$cp LookupDictWords.sh LookupDictWords.sh.random
Step 4B. Open LookupDictWords.sh. Select all code, delete it. Now copy the code from the box below, paste it to the LookupDictWords.sh file and save.
Step 4C. Click on the task bar icon for LookupDictWords.sh script to start.
FOR USER INPUT
Enter your word and press [OK] for user word lookup or
FOR RANDOM WORD
Leave input empty and press [OK] for random word lookup or
TO EXIT
Press [Escape] key or click on [CANCEL] to exit.
PLEASE NOTE
Zorin7 OS and a browser(I used Chrome 28).
Zenity(I used version 3.6.0).
ADD SCRIPT TO MAIN MENU FIRST
User programs and scripts need to be added to the Start Menu first before you can add them to the task bar.
DEBUGGING
First open a terminal, go to /tmp directory and run one or more of the following commands to debug.
cd /tmp;
If the browser won't start, make sure you can start your browser manually by typing at the command prompt
$chrome
or
$firefox
etc. Use
$which chrome
or
$which firefox
etc to get the path and insert it in the script if needed.
You may also use the commands below.
ls -l dicx.htm [See if output file exists]
cat dicx.htm [View contents of output file]
ps -ef|grep LookupDictWords.sh [Use this to see if the script is running and possibly remove it with the [kill -9 pid] command if needed]
CLICK-AND-WAIT
Click gently on the LookupDictWords.sh icon on the task bar, and WAIT for the browser to come back with the results BEFORE CLICKING AGAIN. Fast and furious clicking may cause unpredictable results.
CREDITS
THAT'S ALL FOR NOW!
Remember to visit sqlhtm.com for the latest tweet/Bible verse viewer "Polar Verses" and more tools!





