Multi-Search3
Showing posts with label Puppy Linux. Show all posts

Power Up Puppy Lucid510 Linux.Part2-US Holidays In System Prompt And Four More Tips!


Puppy Lucid510 Linux Desktop


In the last article, we discussed start menu customization and LHS taskbar tray customization. Let us continue with four more important tasks here - setting the System Prompt, Aliases, Rightclick-Open/With and Default Programs - four tasks that are useful to any Puppy Lucid510 Linux user at any time whether used at logon or after it.


1. SETTING THE SYSTEM PROMPT 
When useful? At logon or anytime 

Start a terminal [Startmenu-Utility-Urxvt terminal emulator].
See the pound sign[#]?
Now type
#export PS1=''
What happened? Pound's gone. Vanished. We are poor now, too bad, wait a second. Now type
ls
See the file list? Type
df
See the used, free space allocation display?

Hey, stop stop, where do you think are we going with this now?

Easy! Cool down! We just saw the effects of setting the system prompt to null a minute ago with
export PS1='' and got impoverished. Let us reset the system prompt with a better prompt. Type
export PS1="\h"
Got the hostname!
export PS1="\h-\u"
Hostname and the username!
export PS1="\h-\u-\w"
Hostname, username and the current working directory!
export PS1="\h-\u-\w-#"
At last! This code gave us the hostname, userid, current working directory and our pound back! We are rich again now! But why is everything in black and white? Let's add some color to it and also thank a reference site on the net for sharing a variant of the line of code below we are building upon.
export PS1="\[\033[07;35m\]\[\033[07;31m\]\h-\[\033[07;35m\]\u-\[\033[32;40m\]\w-\[\033[00;31m\]#\[\e[m\]"
Now, we can add our own string[HelloWorld] to display at the very beginning of the system prompt.
export PS1="\[\033[07;34m\]HelloWorld-\[\033[07;31m\]\h-\[\033[07;35m\]\u-\[\033[32;40m\]\w-\[\033[00;31m\]#\[\e[m\]"


While this is okay for this session, we need to do more to get it into the startup configuration file so it will run at every logon.

Steps to change the system prompt

Let's say this is the code for our system prompt.
export PS1="\[\033[07;34m\]HelloWorld-\[\033[07;31m\]\h-\[\033[07;35m\]\u-\[\033[32;40m\]\w-\[\033[00;31m\]#\[\e[m\]"

Changing the system prompt for all users

1.Open a terminal as the root user and type
#cd /etc
2.Type
#geany profile & [Now put the above code at the end of the file, save and exit]
3.Run the command below
#. profile

Changing the system prompt for individual users only

1.Open a terminal as the user and type
$cd [user's home dir]
2.Type
$geany .profile & [Now put the above code at the end of the file, save and exit]
3.Run the command below
$. .profile


Note: In general, in any system where the user logs on using the bash, bourne and korn shells, the .profile file in the user's home directory is run first. In my Puppy Lucid510 Linux system, as I am the ONLY user on my system, I used the /etc/profile file to put this code in there even though it is a system-wide file. On bigger systems with many users, the individual .profile files in each user's home directory must be used instead!


JWhat's Bonus - Display US Holidays In The System Prompt!


Here's a little code block I came up with that you can append to your startup file [user's .profile or system's /etc/profile] to display the month, date and major US holidays in the system prompt. Thanks to a little oneliner I found on a reference site or forum on the net, we also get to colorize the system prompt and to display the hostname, username, and current working directory too!

What? Holidays in system prompt? Who'd want that? Everyone'll be home anyway!

Yeah, but for those who mess with their Linux systems all the time, it may make sense. Again you can add birthdays, anniversaries and important days to make it really useful even on regular days!!!

Requirement
The holiday prompt is refreshed only when the .profile or /etc/profile is run which is at every login/relogin or bootup/reboot. So, remember to put this line of code in a script and run it first thing everyday with cron.

For individual users run this line from a cron-scheduled script everyday at 00:01am
. .profile

For all users run this line from a cron-scheduled script everyday at 00:01am
. /etc/profile

Anyway, here is the code block
#========================================================
#Display major US holidays and more in the system prompt 
#========================================================
dat=`date +"%e,%b"`
if [ "$dat" == " 1,Jan" ]; then 
export PS1="\[\033[07;34m\]$dat-NewYear'sDay-\[\033[07;31m\]\h-\[\033[07;35m\]\u-\[\033[32;40m\]\w\[\033[00;31m\]#\[\e[m\]"
elif [ "$dat" == " 6,Jan" ]; then 
export PS1="\[\033[07;34m\]$dat-Epiphany-\[\033[07;31m\]\h-\[\033[07;35m\]\u-\[\033[32;40m\]\w\[\033[00;31m\]#\[\e[m\]"
elif [ "$dat" == " 2,Feb" ]; then 
export PS1="\[\033[07;34m\]$dat-GroundHogDay-\[\033[07;31m\]\h-\[\033[07;35m\]\u-\[\033[32;40m\]\w\[\033[00;31m\]#\[\e[m\]"
elif [ "$dat" == "14,Feb" ]; then 
export PS1="\[\033[07;34m\]$dat-Valentine'sDay-\[\033[07;31m\]\h-\[\033[07;35m\]\u-\[\033[32;40m\]\w\[\033[00;31m\]#\[\e[m\]"
elif [ "$dat" == " 8,Mar" ]; then 
export PS1="\[\033[07;34m\]$dat-Women'sDay-\[\033[07;31m\]\h-\[\033[07;35m\]\u-\[\033[32;40m\]\w\[\033[00;31m\]#\[\e[m\]"
elif [ "$dat" == " 1,Apr" ]; then 
export PS1="\[\033[07;34m\]$dat-AprilFool'sDay-\[\033[07;31m\]\h-\[\033[07;35m\]\u-\[\033[32;40m\]\w\[\033[00;31m\]#\[\e[m\]"
elif [ "$dat" == "14,Jun" ]; then 
export PS1="\[\033[07;34m\]$dat-FlagDay-\[\033[07;31m\]\h-\[\033[07;35m\]\u-\[\033[32;40m\]\w\[\033[00;31m\]#\[\e[m\]"
elif [ "$dat" == " 4,Jul" ]; then 
export PS1="\[\033[07;34m\]$dat-4thOfJuly-IndependenceDay-\[\033[07;31m\]\h-\[\033[07;35m\]\u-\[\033[32;40m\]\w\[\033[00;31m\]#\[\e[m\]"
elif [ "$dat" == "31,Oct" ]; then 
export PS1="\[\033[07;34m\]$dat-Halloween-\[\033[07;31m\]\h-\[\033[07;35m\]\u-\[\033[32;40m\]\w\[\033[00;31m\]#\[\e[m\]"
elif [ "$dat" == "11,Nov" ]; then 
export PS1="\[\033[07;34m\]$dat-Veteran'sDay-\[\033[07;31m\]\h-\[\033[07;35m\]\u-\[\033[32;40m\]\w\[\033[00;31m\]#\[\e[m\]"
elif [ "$dat" == " 8,Dec" ]; then 
export PS1="\[\033[07;34m\]$dat-ImmaculateConceptionOfBVM-\[\033[07;31m\]\h-\[\033[07;35m\]\u-\[\033[32;40m\]\w\[\033[00;31m\]#\[\e[m\]"
elif [ "$dat" == "24,Dec" ]; then 
export PS1="\[\033[07;34m\]$dat-ChristmasEve-\[\033[07;31m\]\h-\[\033[07;35m\]\u-\[\033[32;40m\]\w\[\033[00;31m\]#\[\e[m\]"
elif [ "$dat" == "31,Dec" ]; then 
export PS1="\[\033[07;34m\]$dat-NewYear'sEve-\[\033[07;31m\]\h-\[\033[07;35m\]\u-\[\033[32;40m\]\w\[\033[00;31m\]#\[\e[m\]"
else 
export PS1="\[\033[07;34m\]$dat-HelloWorld!-\[\033[07;31m\]\h-\[\033[07;35m\]\u-\[\033[32;40m\]\w\[\033[00;31m\]#\[\e[m\]"
fi
#========================================================


Now, let's make sure that the code block above works correctly!

1.Open the /etc/profile file. Copy the code block above and paste it at the end. Save it.
2.Open a terminal.
3.Set the date to January 1.
Press [Start menu], then [Desktop] and then [Set date and time]. Use arrows by the left and right of the month to go to [January] and set the date to [1]. Press [Ok].
4.In the next window [Set time tool], press [Ok].
5.In the next window [info], press [Ok] and wait for a few seconds.
6.Now, in the terminal, type
# . /etc/profile

If everything's fine we should be seeing "1,Jan-NewYear'sDay..." in the system prompt.

Here's the fun part!
You can accomplish lots of different things other than displaying the dull boring [#] or [$] symbol in the system prompt by modifying the code block above. For example, you can
* Birth days/Anniversaries: 
 Add your own birth day or important family or friends' anniversaries etc.
 [Eg. 3,Mar-Musa'sBirthDay!-puppypc-root-~-#]
* Holidays: 
 Change the holiday list by adding, deleting or changing the holidays.
 [Eg. 1,Jan-NewYear'sDay!-puppypc-root-~-#]
* Reminders[Yoga]: 
 Set aside a week or two and practice one yoga pose per day! 
 It's really fun.[Mountain, Cat, Cow, DFDog, Sphinx...]
 [Eg. 3,Mar-MountainPose!-puppypc-root-~-#]
* Reminders[Todo]: 
 Display a todo item till it is completed.
 [Eg. 3,Mar-CompleteHomePageRedesign!-puppypc-root-~-#]
* Affirmations: 
 Use a one-word affirmation from the list below. Many of these come from 
 a squidoo lens here
 Believe.Smile.Relax.Easy.Think.Practice.Exercise.Learn.Amaze.Build.
 Create.Nurture.Hope.Live.Peace.Listen.Improve.Forgive.Encourage.Dare.Act.
 Excel.
 [Eg. 3,Mar-Smile!-puppypc-root-~-#]
* Favorite Text: 
 Add your name or your favorite person's name or any text at the beginning 
 of the prompt by changing the [HelloWorld!] in the last export statement 
 before the [fi] at the very end if you'd like to. The possibilities are endless.
 [Eg. 3,Mar-Believe!-puppypc-root-~-#]

That's it for the system prompt configuration, let us move to aliases.

2. SETTING COMMAND SHORTCUTS WITH ALIAS
When useful? At logon or anytime

Consider the Linux command "ls". Let us type the following at the system prompt.
#ls -lstrh
This command displays a time sorted, human-readable listing of files in the current directory with the latest files at the end. It would be great if instead of typing
ls -lstrh
every time everywhere we create a shortcut like
l
wouldn't it? We can then type
#l
at the command prompt easily every time! That's what we did in the first line of the alias command list above [See image above]. For a one-time run, we can create a session-expiring alias like this. [Note: My system also allowed me to use single quotes instead of double quotes!]
#alias l="ls -lstrh" 
If we want to be more enterprising, we can put this shortcut into a persistent file that is run by default at every login. In Puppy Lucid510, this persistent config file /root/.bashrc has only one line pointing to
#. /etc/profile
and /etc/profile in turn is used to store all default login configuration parameters. So, let us open the /etc/profile file and put these lines at the end of the file. Since /etc/profile is run every time the /root/.bashrc file is run, which is at every logon, we're all set! [Note: Bigger systems with many users must use the .profile file at the user's home directory instead] Let's test it out real quick. First open /etc/profile with geany text editor.
#geany /etc/profile & 
Let's type this line at the end of this file.
alias l="ls -lstrh"
Let's save this file and run /root/.bashrc for our changes to take effect immediately.
#. /root/.bashrc
Once we have done the above we can then simply type 'l' at the dollar prompt from a terminal in any directory to view a neat, time-sorted and human-readable listing!
#l
Did you see the listing as we expected? I did!


3. CREATING SOFTLINKS FOR THE ROX-FILER RIGHTCLICK OPENWITH/SENDTO 
When useful? At logon or anytime

It's easy to customize the way we want to open different file types with different programs of our choice in Puppy Lucid510. For example, assume we want to rightclick on a html file and open it with Chromium, Firefox or Opera. This is what we need to do.

ln -s /usr/bin/chromium-browser /root/.config/rox.sourceforge.net/SendTo/chrome 
ln -s /usr/bin/firefox /root/.config/rox.sourceforge.net/SendTo/firefox 
ln -s /usr/bin/opera /root/.config/rox.sourceforge.net/SendTo/opera 

We have just created three softlinks for these three programs at the 
[/root/.config/rox.sourceforge.net/SendTo] folder. Changes take place immediately
so we can rightclick on a html file and select [OpenWith] to make sure we can open it with any of the
three browsers mentioned above.

NOTE: The information below comes from the window that opens when we rightclick on a file or folder and choose [File] or [Dir] menu, then select [Openwith] and then select [Customize] at the bottom.

The [Send To] menu provides a quick way to send some files to an application. 
The applications listed are those in the following directories:

/root/.config/rox.sourceforge.net/SendTo
/etc/xdg/rox.sourceforge.net/SendTo

I'll show you your SendTo directory now; you should symlink (Ctrl+Shift drag) 
any applications you want into it. The 'Send To' menu may be opened by Shift+Menu clicking over a file.

Advanced use:
You can also create subdirectories called '.text_html', '.text', etc which will 
only be shown for files of that type. '.group' is shown only when multiple files 
are selected.


4. SETTING DEFAULT PROGRAMS FOR DIFFERENT FILE TYPES
When useful? At logon or anytime 

What, you are not satisfied with a [Rightclick-Open/With] strategy? We can also easily configure a program to open a filetype by default whenever we click on it. Just run these lines from the commandline or from within a script
#browser-chromium
echo '#!/bin/sh
exec chromium-browser "$@" '> /usr/local/bin/defaultbrowser
Now whenever we click on ANY html file it will be opened by Chromium. Just change it to Firefox or Opera if required.


5. BONUS TIP: INFINITE LOOP TO CHECK STATUS OF FILE COPY OR FILE DOWNLOAD

Whether we are copying a giant 1gb or bigger file locally, or downloading stuff over slow internet, there is an easy way to check progress from the commandline.
while true; do du /your-folder/your-giant-file ; sleep 20; date; done
First note the size of the source file before copying/download begins. Then run this command and see how it keeps updating the terminal with the latest file size every 20 seconds and so if the file size is the same several times, the download probably stopped with success or errors. We can press [Ctrl-C] to break out of the loop and check if the file has been downloaded successfully or copied fully and/or rerun the loop command if needed. The [date] command gives a timestamp to tie up the [file size] to. Change the [time interval] to repeat as needed.


Bye! Bye! Woof! Woof!

This completes part2 and also concludes the PowerUp Puppy Lucid510 Linux-Tips To Customize The Startup Sequence Series. There are tons of Linux distributions out there but we need to pick and choose the best one for our needs and requirements. Puppy Linux is a great choice especially if you want a Linux Live CD distribution in the 100-200 MB category that comes with a great working base image and also has a host of pets and other utilities to build up on.

That's really great, isn't it?

Last Updated: 11/3/2013.

Power Up Puppy Lucid 510 Linux - Two Tips To Customize The Start Up Sequence!


Puppy Start Menu - Add A New Menu Group
I have seen a bunch of Live CD Linux distros but when it comes to packing a ton of packages in a small size [Puppy Lucid 5.1.0-where I am still at-under 130MB; the latest Puppy Lucid 5.2.8 just 133MB, download from here], nothing comes close to Puppy Linux. Extendable for even more versatility and power with the dev package and with the ability to run from RAM without even a hard disk, we have most of what we need to run a decent family pc or laptop! Not forgetting the save files that help us keep our sanity by storing persistent settings across shutdowns, and the multitude of open source gems out there, there is hardly very little we'll miss unless we're sitting on the bleeding edge of computing. Let us consider two simple ways to pack even more punch to the Puppy startup sequence, first by customizing the Start Menu and secondly by customizing the LHS tray. Remember we are working with Puppy Lucid 510 Linux here. Don't squat somewhere in Arch Linux and complain if you find things missing or not as found here :)

I. CUSTOMIZING THE START MENU

Before
 

After Adding New Menu[JCMenu]

Before we start anything, let's backup the /root/.jwmrc file.

$cp /root/.jwmrc /root/.jwmrc.bkup

This is the file we need to change to customize the Start Menu. We can edit, delete or even add new entries to the Start Menu by changing the entries here. It creates the Puppy Start Menu [see "Before" image above on the left].

< ?xml version="1.0"? >
< JWM >
< !-- IMPORTANT, ONLY EDIT /etc/xdg/templates/_root_.jwmrc -- >
< !-- jwm menu for puppy Linux -- >
< RootMenu label="Menu" labeled="false" height="24" onroot="3" >

< Menu label="Desktop" icon="x24.png" height="16" >
< Menu label="Desktop Settings" icon="mini.window3d.xpm" height="16" >
< Program label="Chtheme GTK theme chooser" icon="mini.window3d.xpm" >gtk-chtheme< /Program >
< Program label="Configure Xlock screen locking" icon="mini-lock.xpm" >/usr/local/apps/Xlock/AppRun -configure< /Program >
...
< /Menu>
 < Separator/ > 
... 
...
< Menu label="Shutdown" icon="shutdown24.png" height="16" >
< !-- < exit confirm="false" icon="prompt16.xpm" label="Exit to prompt" > -->
< Program label="Exit to prompt" icon="prompt16.xpm" >exec wmexit< /Program >
< Program label="Reboot computer" icon="mini-turn.xpm" >exec wmreboot< /Program >
< Program label="Power-off computer" icon="mini-stop.xpm" >exec wmpoweroff< /Program >
< Program label="Restart X server" icon="mini-x.xpm" >restartwm< /Program >
< Restart label="Restart JWM" icon="mini-windows.xpm"/>
< !-- < Program label="Change Window Manager" icon="mini-windows.xpm" >changewm.sh< /Program > -->
< /Menu >
< /RootMenu >
< /JWM >
< /exit >

Let's just look at the menus and programs at the start of the file since this is where we need to insert code if we wanted to add a new menu or programs. We'll keep things simple and consider only how to add a simple new menu [JCMenu] with a few puppy programs and one of our own scripts between two existing menus [Fun] and [JWhatGKFJ-1], (see "Before" image above on the left). Remember that we can use the [< Separator/ >] tag to separate menus or menu items(programs themselves) just as we have used two separators in our [JCMenu] to separate three program groups (see "After" image above on the right). Assume that we have coded our stuff into the following block [Note:All tags below have been padded with the space character as the second character on the LHS and the RHS. These are for code display and need to be removed before use]:

< Menu label="JCMenu" icon="games24.png" height="16" >
< Program label="ConfigureTouchpad" icon="picpuz.png" >flsynclient &< /Program >
< Program label="PupApps" icon="picpuz.png" >PupApps &< /Program >
< Program label="PupControl" icon="picpuz.png" >PupControl &< /Program >
< Program label="SearchMonkey" icon="picpuz.png" >searchmonkey &< /Program >
< Separator/ >
< Program label="HTop" icon="picpuz.png" >rxvt -e /usr/bin/htop &< /Program >
< Separator/ >
< Program label="FreeSpace1" icon="picpuz.png" >/bin/echo "Free Space[df -h] ">/tmp/1.out; /bin/df -h>>/tmp/1.out; /bin/echo>>/tmp/1.out; /bin/echo "free ">>/tmp/1.out; /bin/free>>/tmp/1.out; geany /tmp/1.out; rm /tmp/1.out< /Program >
< /Menu >
< Separator/ >


Notice how we have used a menu label, a couple of image icons and a program group for our menu above.

MENU LABEL: The label is where we name our menu [JCMenu].

ICONS: For simplicity we are reusing existing Puppy icons games24.png from /usr/local/lib/X11/pixmaps for the menu and picpuz.png from /usr/share/pixmaps/ for the menu items.

PROGRAMS: Here are three ways we can run programs from the Start Menu.

1.For starting up most puppy default programs, we can just call them by name like this.
< Program label="PupApps" icon="picpuz.png" >PupApps &< /Program >

2.Programs such as htop that require the terminal for the whole duration of their run may need to be called like this.
< Program label="HTop" icon="picpuz.png" >rxvt -e /usr/bin/htop &< /Program >

3.Finally we may run our own one liners, shell scripts and we may even run more than one program and display the output at once. For example consider the last menu entry in our code above.
< Program label="FreeSpace1" icon="picpuz.png" >/bin/echo "Free Space[df -h] ">/tmp/1.out; /bin/df -h>>/tmp/1.out; /bin/echo>>/tmp/1.out; /bin/echo "free ">>/tmp/1.out; /bin/free>>/tmp/1.out; geany /tmp/1.out; rm /tmp/1.out< /Program >

The command sequence above runs two commands, collects the output and opens the output file with the Geany editor automatically showing us a nice human-readable free space view and also the free memory view seen below.

Free Space[df -h] 
Filesystem            Size  Used Avail Use% Mounted on
rootfs                727M  100M  628M  14% /
tmpfs                 727M  100M  628M  14% /initrd/pup_rw
tmpfs                 293M  292M  704K 100% /initrd/mnt/tmpfs
/dev/loop0            292M  292M     0 100% /initrd/pup_ro2
unionfs               727M  100M  628M  14% /
shmfs                 287M  140K  287M   1% /dev/shm
/dev/sda1             3.8G  3.3G  489M  88% /mnt/sda1
/dev/sdb1             1.9G  1.6G  305M  85% /mnt/sdb1

free 
              total         used         free       shared      buffers
  Mem:      1488768      1274172       214596            0       117244
 Swap:            0            0            0
Total:      1488768      1274172       214596

Okay, let's take our favorite menu code [shown in color red below] and plug it into the existing code just below the menu called [Fun]. Notice how nicely we have arranged four Puppy programs, htop after these, and our own command sequence menu item grouped neatly into nice blocks with seperators! After the code insert it looks like this.

< ?xml version="1.0"? >
< JWM >
< !-- IMPORTANT, ONLY EDIT /etc/xdg/templates/_root_.jwmrc -- >
< !-- jwm menu for puppy Linux -- >
< RootMenu label="Menu" labeled="false" height="24" onroot="3" >

< Menu label="Desktop" icon="x24.png" height="16" >
< Menu label="Desktop Settings" icon="mini.window3d.xpm" height="16" >
< Program label="Chtheme GTK theme chooser" icon="mini.window3d.xpm" >gtk-chtheme< /Program >
< Program label="Configure Xlock screen locking" icon="mini-lock.xpm" >/usr/local/apps/Xlock/AppRun -configure< /Program >
...
< /Menu >
 < Separator/ > 
... 
...
...
< Menu label="Fun" icon="games24.png" height="16" >
< Program label="PicPuz jigsaw puzzle" icon="picpuz.png" >picpuz< /Program >
< Program label="Rubix cube" icon="cube16.xpm" >rubix< /Program >
< Program label="Tile slider game" icon="mini-modules.xpm" >tile< /Program >
< Program label="XEmeraldia drop blocks" icon="xemeraldia.xpm" >xemeraldia< /Program >
< Program label="Xinvaders3d Arcade Game  " icon="xinvaders.png" >xinv3d< /Program >
< Program label="Xsoldier - space arcade" icon="xsoldier.xpm" >xsoldier< /Program >
< /Menu >
< Separator/ >

< Menu label="JCMenu" icon="games24.png" height="16" >
< Program label="ConfigureTouchpad" icon="picpuz.png" >flsynclient &< /Program >
< Program label="PupApps" icon="picpuz.png" >PupApps &< /Program >
< Program label="PupControl" icon="picpuz.png" >PupControl &< /Program >
< Program label="SearchMonkey" icon="picpuz.png" >searchmonkey &< /Program >
< Separator/ >
< Program label="HTop" icon="picpuz.png" >rxvt -e /usr/bin/htop &< /Program >
< Separator/ >
< Program label="FreeSpace1" icon="picpuz.png" >/bin/echo "Free Space[df -h] ">/tmp/1.out; /bin/df -h>>/tmp/1.out; /bin/echo>>/tmp/1.out; /bin/echo "free ">>/tmp/1.out; /bin/free>>/tmp/1.out; geany /tmp/1.out; rm /tmp/1.out< /Program >
< /Menu >
< Separator/ >
...
...
< Program label="Help" icon="help24.png" >exec defaulthtmlviewer file:///usr/share/doc/index.html< /Program >

< Menu label="Shutdown" icon="shutdown24.png" height="16" >

< Program label="Exit to prompt" icon="prompt16.xpm" >exec wmexit< /Program >
< Program label="Reboot computer" icon="mini-turn.xpm" >exec wmreboot< /Program >
< Program label="Power-off computer" icon="mini-stop.xpm" >exec wmpoweroff< /Program >
< Program label="Restart X server" icon="mini-x.xpm" >restartwm< /Program >
< Restart label="Restart JWM" icon="mini-windows.xpm"/ >
< !-- < Program label="Change Window Manager" icon="mini-windows.xpm">changewm.sh< /Program > -- >
< /Menu >
< /RootMenu >
< /JWM >

Remember to run the Restart JWM menu option from the Puppy Start Menu every time after any change is made to the /root/.jwmrc file to view changes. [Menu->Shutdown->Restart JWM].
Run Restart JWM After Changes
Once we do that we get to see the new menu [JCMenu] displayed as seen on the "Before" and "After" images above. That's our very own customized Start Menu, don't you love it? I do!


II. CUSTOMIZING THE LHS TRAY ON THE TASKBAR AT THE BOTTOM

Taskbar LHS Tray-Before
  
Taskbar LHS Tray-After Adding More Program Icons
   

Let's look at how we can improve the LHS tray next to the Start Menu icon on the taskbar at the bottom by adding some more icons there. As you know, this is probably the best place to keep icons of the top few programs we run everytime day after day. This time we'll modify the /root/.jwmrc-tray file to add more items to the LHS tray. As usual, let's backup the current file before we start.

$cp /root/.jwmrc-tray /root/.jwmrc-tray.bkup

This is what the code looks like initially:
< JWM > 
   < Tray  autohide="false" insert="right" x="0" y="-1" border="1" height="28" > 
      < !-- Additional TrayButton attribute: label -- > 
      < TrayButton label="Menu" icon="mini-dog.xpm" >root:3< /TrayButton > 
      < !-- < traybutton icon="gexec.xpm" popup="Run commandline" >exec:gexec< /TrayButton > -- > 
      < TrayButton popup="Show Desktop" icon="mini-desktop.xpm" >showdesktop< /TrayButton > 
      < TrayButton popup="Free space in drives" icon="mini-hdisk.xpm" >exec:partview< /TrayButton > 
      < TrayButton popup="Choose Default Browser" icon="www24.png" >exec:browser-default< /TrayButton > 
        
      < !-- Additional Pager attributes; width, height -- > 
      < Pager/ > 
      < !-- Additional TaskList attribute: maxwidth -- > 
      < TaskList/ > 
      < Dock/ > 
      < !-- Additional Swallow attribute: height -- > 
      < Swallow name="blinky" > 
  blinkydelayed -bg "#4D525B"
      < /Swallow > 
      < !--  -- > 
      < !--    asapmshell -u 4 -- > 
      < !--  -- > 
      < Swallow name="freememapplet" width="34" > 
        freememappletshell 
      < /Swallow > 
      < Swallow name="xload" width="32" > 
  xload -nolabel -fg red -hl white -bg "gray45"
      < /Swallow > 
      < Clock >minixcal< /Clock > 
   < /Tray > 
< /JWM >

This below is our code to add more programs to the LHS tray RIGHT next to the Start Menu icon:

        < TrayButton popup="Pupdial" icon="/usr/local/apps/Connect/.DirIcon" >exec:/usr/sbin/pupdial< /TrayButton > 
        < TrayButton popup="Term" icon="/usr/local/lib/X11/pixmaps/console48.png" >exec:/usr/bin/urxvt< /TrayButton > 
        < TrayButton popup="Rox" icon="/usr/local/lib/X11/pixmaps/home48.png" >exec:/usr/local/bin/rox< /TrayButton > 
        < TrayButton popup="Gny" icon="/usr/local/lib/X11/pixmaps/edit48.png" >exec:/usr/local/bin/defaulttexteditor< /TrayButton > 
        < TrayButton popup="Lck" icon="/usr/local/apps/Xlock/.DirIcon" >exec:/usr/bin/xlock< /TrayButton >
        < TrayButton popup="Save" icon="/usr/local/lib/X11/pixmaps/save48.png" >exec:/usr/sbin/save2flash< /TrayButton >
        < TrayButton popup="Htop" icon="/usr/local/lib/X11/pixmaps/draw48.png" >exec:/usr/bin/urxvt -e /usr/bin/htop< /TrayButton >

This is the final code with our inserted code in red. Remember to remove the spaces at start and end of every line, if copy/pasting:

< JWM > 
   < Tray  autohide="false" insert="right" x="0" y="-1" border="1" height="28" > 
      < !-- Additional TrayButton attribute: label -- > 
      < TrayButton label="Menu" icon="mini-dog.xpm" >root:3< /TrayButton > 
   < !-- exec:gexec< /TrayButton > --> 
      < TrayButton popup="Show Desktop" icon="mini-desktop.xpm" >showdesktop< /TrayButton > 
      < TrayButton popup="Free space in drives" icon="mini-hdisk.xpm" >exec:partview< /TrayButton > 
      < TrayButton popup="Choose Default Browser" icon="www24.png" >exec:browser-default< /TrayButton > 

  
        < TrayButton popup="Pupdial" icon="/usr/local/apps/Connect/.DirIcon" >exec:/usr/sbin/pupdial< /TrayButton > 
        < TrayButton popup="Term" icon="/usr/local/lib/X11/pixmaps/console48.png" >exec:/usr/bin/urxvt< /TrayButton > 
        < TrayButton popup="Rox" icon="/usr/local/lib/X11/pixmaps/home48.png" >exec:/usr/local/bin/rox< /TrayButton > 
        < TrayButton popup="Gny" icon="/usr/local/lib/X11/pixmaps/edit48.png" >exec:/usr/local/bin/defaulttexteditor< /TrayButton > 
        < TrayButton popup="Lck" icon="/usr/local/apps/Xlock/.DirIcon" >exec:/usr/bin/xlock< /TrayButton >
        < TrayButton popup="Save" icon="/usr/local/lib/X11/pixmaps/save48.png" >exec:/usr/sbin/save2flash< /TrayButton >
        < TrayButton popup="Htop" icon="/usr/local/lib/X11/pixmaps/draw48.png" >exec:/usr/bin/urxvt -e /usr/bin/htop< /TrayButton >    
        
        
      < !-- Additional Pager attributes; width, height -- > 
      < Pager/ > 
      < !-- Additional TaskList attribute: maxwidth -- > 
      < TaskList/ > 
      < Dock/ > 
      < !-- Additional Swallow attribute: height -- > 
      < Swallow name="blinky" > 
  blinkydelayed -bg "#4D525B"
      < /Swallow > 
      < !--  -- > 
      < !--    asapmshell -u 4 -- > 
      < !--  -- > 
      < Swallow name="freememapplet" width="34" > 
        freememappletshell 
      < /Swallow > 
      < Swallow name="xload" width="32" > 
  xload -nolabel -fg red -hl white -bg "gray45"
      < /Swallow > 
      < Clock >minixcal< /Clock > 
   < /Tray > 
< /JWM >
< /traybutton >

Remember to run the Restart JWM menu option from the Puppy Start Menu every time after any change is made to the /root/.jwmrc-tray file to view changes. [Menu->Shutdown->Restart JWM] and look what we got! A whole new bunch of icons added to the LHS tray! Hooray!

Taskbar LHS Tray-Before

Taskbar LHS Tray-After Adding More Program Icons


Look at the image above to see the before and after views of how the LHS tray looks at the bottom of the screen. This completes the first set of two power tips to enrich the start up sequence of Puppy Lucid 510 Linux. More to follow soon!

IMPORTANT INFORMATION!

A [space] character has been inserted after the first character and before the last character of some xml tags in the display code blocks to protect display and need to be removed before use if copy/pasted. For example,

 < Menu >
 < Separator/ > 
 < TaskList/ > 
 < Dock/ > 
from code display must have the spaces removed when used in xml source code.

UPDATE

Remember to use the bulk replace option in the text editor you use to save time and also to 
prevent some angry cursing. For example, in Geany and gnome-text-editor I used this method to 
remove the extraneous spacing in a few key strokes and a few seconds instead of individual 
replacements that might have taken for ever. Make changes first in a fresh new blank editor page so you can transfer the text to the script after the editing is complete. Where it applies 
below, remove the square brackets used for accent and to mark out the space character.

GEANY
   Type [geany] leaving out the square brackets from command line or start it from [Start Menu]->[Accessories]
   Paste and select the text to change.
   Press [Ctrl-H] to bring up the replace box and click on [Replace All] to expand. 
   Type [< ] in the [Search for] input box. 
   Type [<] in the [Replace with] input box.
   Press the [In Selection] button to complete.
   Similarly, repeat the same steps for [ >].

GNOME TEXT EDITOR
   Type [gnome-text-editor] leaving out the square brackets from command line or start it from [Start Menu]->[Programming] and paste the code.
   Press [Ctrl-H] to bring up the replace box.
   Type [< ] in the [Find what] input box. 
   Type [<] in the [Replace with] input box.
   Click on [Replace all at once] to select it.
   Type [Find and replace] to complete.
   Similarly, repeat the same steps for [ >].


@Font-face - There Is More To Fonts Than Font-Family!

@FONT-FACE CSS AT-RULE. 
[Disclaimer: The gen-fonts.sh shell script using  CSS @font-face was tested on Chromium[12.0.742.112 ] and Opera[11.60] browsers on Puppy Lucid5.1 Linux. Check if your OS and your browser support it to make sure.]

gen-fonts.sh   VIEW SAMPLE   DOWNLOAD SCRIPT

GET THE SAME LOOK EVERYWHERE WITH @FONT-FACE. GUARANTEED!

Even if someone had the worst website in the world, people might still flock to that site if only it had a great-looking font scheme. However simple or sparse that website, if it had a clean font scheme and used plenty of white space in a smart way, it could still make a lot of people visit often. The white color has the amazing quality of bringing out the real character of any and every font especially at higher sizes. In the old days it was so easy to just get by with some basic fonts and the header and paragraph tags. Not so anymore. The web has grown as if on steroids over the past decade and things are not simple anymore. While configuring a good font for your website with the @font-face css rule may look complex and cumbersome, it doesn't have to be so. Definitely not if you choose to use the simple scheme described in this article. I have been using Puppy Lucid Linux5.1 for over a year now and I have come up with a shell script which discovers and displays all installed fonts on a Linux system by dynamically generating code for the @font-face rules in the style block in the header and also the code for the body text in a webpage you can view with your browser. It may even show you the simplest way to use @font-face rules in your own webpages to make sure anyone and everyone in the whole wide world would see the same font display!
Sample wordart with Font3dTemplates
NOW YOU SEE, NOW YOU DON'T

Don't you hate it when the text and image editors on your Linux system can display all installed fonts correctly but your web pages can't? It happened a lot to me on my Puppy Lucid Linux5.1 and that's the reason for this article. Even after I installed the fonts correctly and used body text with font-family in the tags, it still wouldn't show all fonts! If you guessed not using @font-face in the stylesheet with font-family and physical file location as the reason, you are web smart! And once I did it, it was like going digging and finding gold. All fonts sprang to life so spectacularly I couldn't believe my eyes! 

FONT LOCATIONS AND INSTALLATION ON A LINUX SYSTEM

PUPPY LUCID5.1 LINUX

Step 1: Copy the ttf or other font files to /root/.fonts directory. You may also copy the true type fonts to the /usr/share/fonts/default/TTF directory.
Step 2: Run the fc-cache command to cache the fonts.
fc-cache -fv
Step 3: Restart your browser for changes to take effect.

OTHER LINUX FLAVORS [MAY VARY] 

Step 1: Download and copy the true type font files to /usr/share/fonts/default/TTF directory.
Step 2: Restart your browser for changes to take effect.

NOTE 1. Soft Links
You may also keep the font files at any directory and create soft links to font locations like this:
ln -s /your-font-directory/your-font.ttf  /root/.fonts
or
ln -s /your-font-directory/your-font.ttf  /usr/share/fonts/default/TTF

NOTE 2. Puppy Linux Font Locations
I'm not sure, but the following information probably comes from the Puppy Linux documentation or the helpful puppy forums.
fc-cache -fv command caches fonts from these directories and cleans some of them at the end. 
/root/.fonts
/usr/share/fonts
/usr/share/fonts/default
/usr/share/fonts/default/TTF
/usr/share/fonts/default/Type1
/usr/share/fonts/truetype
/usr/share/fonts/truetype/ttf-liberation
/usr/share/X11/fonts
/usr/share/X11/fonts/TTF
/usr/share/X11/fonts/Type1
/usr/share/X11/fonts/misc
NOTE 3. Script And Fontlist Webpage Speed
The script script runs fast. The webpage fontlist may be fast or slow THE FIRST TIME depending on the number of fonts in the font directory.

NOTE 4. Treasure-hunt Your Font Directories
Try running the script on all the directories returned by running the command 
fc-cache -fv. Trace soft links to their source files if needed.

NOTE 5. As Few Fonts As Possible
Use only the minimum-required number of fonts at your website as it may become unbearably resource-hungry.

SHELL SCRIPT TO GENERATE AND VIEW ALL INSTALLED FONTS ON YOUR LINUX SYSTEM [gen-fonts.sh]

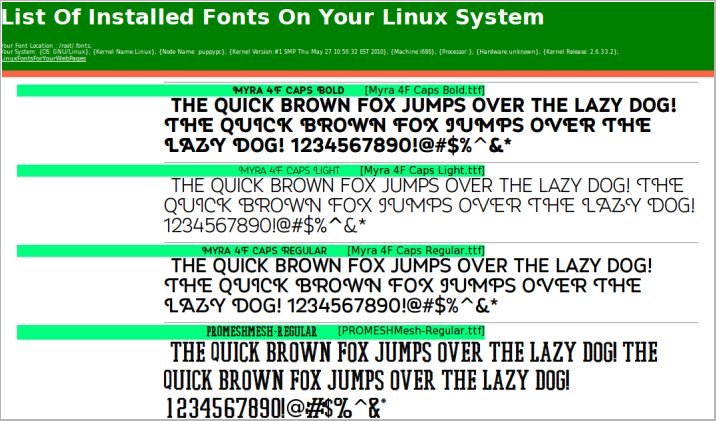
gen-fonts.sh-sample
Font list display produced by gen-fonts.sh

Okay, so we now know how to install fonts on Puppy and other Linux systems. Let us go ahead and see how to use the @font-face rule in your embedded style sheet. First we will get the font location and loop to read one font at a time to generate the @font-face code in the head section and then we will loop one more time to create the code, this time for the anchor or paragraph tags inside the body of the web page.

The script below combines both steps to dynamically produce the list of all installed fonts on your Linux system in a web page.

INSTALLATION OF THE SCRIPT 

GUI

1.DOWNLOAD SCRIPT and extract the file gen-fonts.sh at /tmp.
2.Change the first 2 lines of the script for font directory and the browser string
3.With a file manager like ROX-filer, right-click on the gen-fonts.sh file, and check the 3 boxes at the end to make all 3 executable
4.Click on the script to generate and view the list of installed fonts in your system. 

COMMAND LINE 

1.DOWNLOAD SCRIPT and extract the file gen-fonts.sh at /tmp.
2.Change the first 2 lines of the script for font directory and the browser string
3.Open up a terminal and type cd /tmp; chmod 755 gen-fonts.sh
4.Type ./gen-fonts.sh to run and view the installed fonts in a html file


ADAPTING THE SCRIPT FOR USE IN WEBSITES ONLINE

  • First, copy your font files to a directory on your server, such as public-html/fonts or www/fonts, both of which point to the same location.
  • Second, taking the code below as a sample , create @font-face rules for every font in the style block of the header. Eg.
        <head><style>
        @font-face {font-family:'Bigfish'; src:url('fonts/Bigfish.ttf'); }
        </style></head>

  • To end, put your text within tags such as "a" or "p" in the body. Eg.
  <a class="btxt" href="">List Of Installed Fonts On Your Linux System</a>

Simple sample page using @font-face for your website page

<html>
<head>
<style> 
@font-face {font-family:'Bigfish'; src:url('fonts/Bigfish.ttf'); }
.btxt {font-family:'Bigfish'; font-size:15px; }
</style>
</head>
<body> 
<a class="btxt">List Of Installed Fonts On Your Linux System</a> 
</body>
</html>

When we use fonts this way on the server hosting our website, everyone will see the same font on their laptop or pc even if they don't have this font installed. The only requirement is that their browsers must support the @font-face rule.


   Did you know?    
   Typing the following command helps create a sorted display of available fonts   
fc-list|sort   


Sample wordart-Font3d

HAVE YOU DOWNLOADED MY THREE FREE FONT PROGRAMS YET????

I have created four free font tools, three of which are free downloads. These three come with install and uninstall scripts that can be used for viewing the installed fonts on your Windows laptop or pc and also to view your text in all installed fonts and generate 3d wordart. Take a minute to read about these at sqlhtm.com. The fourth is an online web application. Watch the slideshow and play with the 4th tool online at sqlhtm.com! These are sure to be great additions to your toolset for online and offline web or other projects.


1.MyFontYourFont
Reads all your installed fonts on Windows and generates and shows sample text in horizontal and vertical formats in various sizes.


2.MyFontYourFontHot
Reads your text and displays them with all installed fonts so you can select the best-looking one for your blog or website article.


3.Font3dRandom
This is one of my bigger font projects which lets you create 3d html oneliner wordart with a totally endless variety of font and color combinations.


4.Font3dTemplates
This one's my biggest effort on 3dfont wordart program till date. The first version which is an online basic version creates simple wordart with installed regular and other floral and decorative fonts on Windows XP. When the regular fonts we use in everyday life or magnified, colored and shaded, we see MAGIC! Even fonts with your portraits or those of the celebrities can be enlarged, colored and 3d-shaded! It's that simple. The newer version currently under development has the really cool image and text drag-n-drop, local storage html5 features among others compared to the older version.

SOME VALUABLE FONT-RELATED WEBSITES ON THE WEB


After reading this article, optimist said, "Nice read". Pessimist said, "fc-list".


Five Quick Suggestions For No-Nonsense, Superfast Text Browsing!


Sick and tired of image and multimedia overload in everyday browsing and want to skip images for a while but need to read the text at the same time? Travelling and stuck with low bandwidth? Researching reference sites and need text browsing by choice? There may be a hundred and one reasons, but let us set out to find a few easy ways for text browsing.

1.GOOGLE SEARCH PAGE


Select [CACHED OPTION] from the pulldown menu at the end of the second line of every search page result and then click on [TEXT-ONLY VERSION] to view the text-only version of the page. If you know the address of the website, you can first type cache:www.website.com and then select the [TEXT-ONLY VERSION] from the top-right.

2.CHROMIUM 12.0[LINUX]

Chromium


Select [DO NOT SHOW ANY IMAGES] radio button from the SETTINGS wrench with the tool tip "customize and control chromium"->[PREFERENCES]->[UNDER THE HOOD]->[PRIVACY]->[CONTENT SETTINGS]->[IMAGES].

3.FIREFOX 13.0[LINUX]

FireFox
Uncheck the [LOAD IMAGES AUTOMATICALLY] checkbox on the [CONTENT] panel from [EDIT] Menu->[PREFERENCES].

4.OPERA 11.60[LINUX]

Opera

Select [NO IMAGES] from the [IMAGES] pulldown menu from the [Opera] button on the top left->[SETTINGS]->[PREFERENCES]->[WEB PAGES] tab.

NOTE: Differences in browsers, browser versions and the Operating systems mentioned above and the others that aren't, may mean slightly different changes in locations and labels.

5.LYNX[Linux/Win and others]

Lynx

Okay, having the newer browsers covered, let us spend the rest of the article
with the CLI[command line interface] of the slightly older Lynx Text Browser to
get to the text or html versions of a web page and also get lists of links within
the same page.

DOWNLOAD THE LYNX BROWSER


First download the lynx browser from http://lynx.browser.org. Lynx 2.8.7 runs
on Un*x, MacOS, VMS, Windows 95/98/NT, DOS386+. I use it with Puppy Lucid 5.1 Linux on my Toshiba Satellite laptop. Once we have downloaded and installed the Lynx browser, we can browse the text version of the websites on the web with the default program or we can also use the CLI to get things done from the commandline like we do in this article. Once we have the address of the web page, we can use the -base, -dump, -listonly and -nonumbers options of the lynx CLI to get things going. I am using the geany text editor on my linux system to view the results of the lynx command for this article. Use a text editor , location and filenames of your choice.

TYPICAL USES OF THE LYNX COMMAND

cd /tmp

USAGE1: Get the pure html source of the webpage
lynx -source "http://www.sqlhtm.com/About.htm">lynx.txt; geany lynx.txt

USAGE2: Get the text of the webpage with numbered links, no images[image tags only]
and lists of reference and hidden links at the bottom
lynx -dump "http://www.sqlhtm.com/About.htm">lynx.txt; geany lynx.txt

USAGE3: Get the lists of links in the webpage only[no text or images]:
lynx -dump -listonly "http://www.sqlhtm.com/About.htm">lynx.txt; geany lynx.txt

USAGE4: Get the lists of links only without link numbering and without text:
lynx -dump -listonly -nonumbers "http://www.sqlhtm.com/About.htm">lynx.txt; geany lynx.txt

USAGE5: Get the text of page and the links at the bottom but disable the link numbering
lynx -dump -nonumbers "http://www.sqlhtm.com/About.htm">lynx.txt; geany lynx.txt

USAGE6: Get the text, link lists at bottom with numbers from webpage with no images[only image tags]
lynx -dump -base "http://www.sqlhtm.com/About.htm" >lynx.txt; geany lynx.txt

USAGE7: Get the text with no images[only image tags] and no lists of links at the bottom:
lynx -dump -base "http://www.sqlhtm.com/About.htm"|sed 'References/,$d' >lynx.txt; geany lynx.txt
[sed note: valid as on may2013]

GETTING LINKS FROM GOOGLE SERP[Search Engine Results Page] FOR THE LYNX CLI USAGE SUCH AS ABOVE


CASE1: CLEAN LINK ON THE SECOND LINE BELOW THE TITLE LINE

If we have a good link with a clean format such as http://www.sqlhtm.com/About.htm, we'll have absolutely no problems but if we're going to depend on google search for links, we might get lucky or unlucky depending on what the SERP[search engine results page] deigns to provide us. Look at the image above and consider the two cases below. First we have some results with a clean web address on the second line of the result below the top title line such as the one below. We can grab this just like it is and use it without changes.

EXAMPLE

Sed Command in Unix and Linux Examples
www.folkstalk.com/2012/01/sed-command-in-unix-examples.html‎


CASE2: MESSY LINK TO CLEAN UP FOR LYNX CLI USAGE

While an address such as the one above is what we want, oftentimes we run out of luck and end up having to rightclick on the title and select the [copy link
address] option to get a really messy google-formatted link with characters that
need to be cleaned up so the link is acceptable to the lynx command line deity.
To do this, we need to delete a portion at the beginning of the messy address,
delete another at the end, and also replace the code [%3A] with colon [:] and [%2F] with forward slash [/] in the reminder of the address.

EXAMPLE

Linux / Unix: sed Command Print Only Matching Lines - nixCraft
www.cyberciti.biz/.../unix-linux-sed-print-only-matching-lines-comman...‎


Do you notice the three dots from hell leading to nowhere in the middle and also at the end? This is no good. So we'll rightclick on the top title link and select the [copy link address] option to get an equally-lousy-if-not-worse address below.

http://www.google.co.in/url?sa=t&rct=j&q=Sed+Command+in+Unix+and+Linux+Examples&source=web&cd=5&cad=rja&ved=0CE8QFjAE&url=http%3A%2F%2Fwww.cyberciti.biz%2Ffaq%2Funix-linux-sed-print-only-matching-lines-command%2F&ei=_IOHUdT3IILqrQfiu4CgDg&usg=AFQjCNEpchgcEfzvOIjMDj0bLJhdPyrSig&sig2=UFZgetDwLrizo9LQ0Km5jQ

Lynx CLI hates this address, throws an error message! Deciphering this address
is not rocket science but everyone can only have so much patience for things of
this sort, don't you agree? Let us keep moving and finish cleaning up this scary
mess as much as we can.

1.Delete from the beginning all the way upto [URL=].
ie. Delete this from the beginning [http://www.google.co.in/url?sa=t&rct=j&q=Sed+Command+in+Unix+and+Linux+Examples&source=web&cd=5&cad=rja&ved=0CE8QFjAE&url=]

2.Delete everything from &ei till the end of line.
ie. Delete this at the end of the address:
[&ei=_IOHUdT3IILqrQfiu4CgDg&usg=AFQjCNEpchgcEfzvOIjMDj0bLJhdPyrSig&sig2=UFZgetDwLrizo9LQ0Km5jQ]


3.Replace [%3A] with [:] and [%2F] with forward slash[/] in the leftover address.
In this step, we start with address [http%3A%2F%2Fwww.cyberciti.biz%2Ffaq%2Funix-linux-sed-print-only-matching-lines-command%2F] and
end up with the address[http://www.cyberciti.biz/faq/unix-linux-sed-print-only-matching-lines-command]

There, we got what we needed, a really clean lynx CLI-acceptable address!
Using this address in any of the several ways above, we can get what we want - the html or text version of the page with or without the links on the page!

REDIRECTS

If the link we are using is a redirect, then we may not get the text of the
page at once, but only an alternate link in the output of the lynx command. We need to run the same lynx command again with this redirect link and then we will get the required text source of the page.

FINAL WORD

While a picture may be worth a thousand words, it is nice to be able to be content with words for a change, at least once in a while, at least considering the useless, bloated, unhealthy or harmful images on the net! But dude, I know where you are headed right after reading this - right back to your G+s, pinterests and tumblrs, but really can't blame you. Who'd want to stay with text only other than those stuck with dial-up or slow internet?

BlogCollage


Blog Collage - Top Random Posts In No Particular Order

Mouseover the images for title and comments