7/17/2013 03:00:00 AM

Jsc Jwhat Jerome Christopher
, Posted in
Browsers
,
Chrome
,
Download This
,
Font Tools
,
Linux
,
Online wordart creator
,
Puppy Linux
,
Sqlhtm Tools
,
Unix
,
Windows XP

 |
| @FONT-FACE CSS AT-RULE. |
[Disclaimer: The gen-fonts.sh shell script using CSS @font-face was tested on Chromium[12.0.742.112 ] and Opera[11.60] browsers on Puppy Lucid5.1 Linux. Check if your OS and your browser support it to make sure.]
GET THE SAME LOOK EVERYWHERE WITH @FONT-FACE. GUARANTEED!
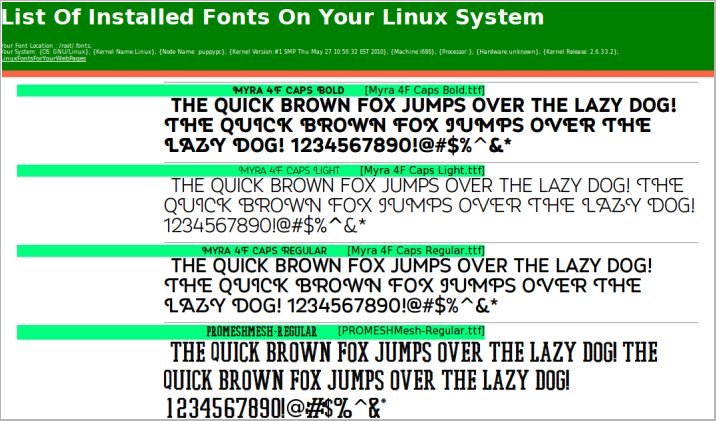
Even if someone had the worst website in the world, people might still flock to that site if only it had a great-looking font scheme. However simple or sparse that website, if it had a clean font scheme and used plenty of white space in a smart way, it could still make a lot of people visit often. The white color has the amazing quality of bringing out the real character of any and every font especially at higher sizes. In the old days it was so easy to just get by with some basic fonts and the header and paragraph tags. Not so anymore. The web has grown as if on steroids over the past decade and things are not simple anymore. While configuring a good font for your website with the @font-face css rule may look complex and cumbersome, it doesn't have to be so. Definitely not if you choose to use the simple scheme described in this article. I have been using Puppy Lucid Linux5.1 for over a year now and I have come up with a shell script which discovers and displays all installed fonts on a Linux system by dynamically generating code for the @font-face rules in the style block in the header and also the code for the body text in a webpage you can view with your browser. It may even show you the simplest way to use @font-face rules in your own webpages to make sure anyone and everyone in the whole wide world would see the same font display!
 |
| Sample wordart with Font3dTemplates |
NOW YOU SEE, NOW YOU DON'T
Don't you hate it when the text and image editors on your Linux system can display all installed fonts correctly but your web pages can't? It happened a lot to me on my Puppy Lucid Linux5.1 and that's the reason for this article. Even after I installed the fonts correctly and used body text with font-family in the tags, it still wouldn't show all fonts! If you guessed not using @font-face in the stylesheet with font-family and physical file location as the reason, you are web smart! And once I did it, it was like going digging and finding gold. All fonts sprang to life so spectacularly I couldn't believe my eyes!
FONT LOCATIONS AND INSTALLATION ON A LINUX SYSTEM
PUPPY LUCID5.1 LINUX
Step 1: Copy the ttf or other font files to /root/.fonts directory. You may also copy the true type fonts to the /usr/share/fonts/default/TTF directory.
Step 2: Run the fc-cache command to cache the fonts.
fc-cache -fv
Step 3: Restart your browser for changes to take effect.
OTHER LINUX FLAVORS [MAY VARY]
Step 1: Download and copy the true type font files to /usr/share/fonts/default/TTF directory.
Step 2: Restart your browser for changes to take effect.
NOTE 1. Soft Links
You may also keep the font files at any directory and create soft links to font locations like this:
ln -s /your-font-directory/your-font.ttf /root/.fonts
or
ln -s /your-font-directory/your-font.ttf /usr/share/fonts/default/TTF
NOTE 2. Puppy Linux Font Locations
I'm not sure, but the following information probably comes from the Puppy Linux documentation or the helpful puppy forums.
fc-cache -fv command caches fonts from these directories and cleans some of them at the end.
/root/.fonts
/usr/share/fonts
/usr/share/fonts/default
/usr/share/fonts/default/TTF
/usr/share/fonts/default/Type1
/usr/share/fonts/truetype
/usr/share/fonts/truetype/ttf-liberation
/usr/share/X11/fonts
/usr/share/X11/fonts/TTF
/usr/share/X11/fonts/Type1
/usr/share/X11/fonts/misc
NOTE 3. Script And Fontlist Webpage Speed
The script script runs fast. The webpage fontlist may be fast or slow THE FIRST TIME depending on the number of fonts in the font directory.
NOTE 4. Treasure-hunt Your Font Directories
Try running the script on all the directories returned by running the command
fc-cache -fv. Trace soft links to their source files if needed.
NOTE 5. As Few Fonts As Possible
Use only the minimum-required number of fonts at your website as it may become unbearably resource-hungry.
SHELL SCRIPT TO GENERATE AND VIEW ALL INSTALLED FONTS ON YOUR LINUX SYSTEM [gen-fonts.sh]
Okay, so we now know how to install fonts on Puppy and other Linux systems. Let us go ahead and see how to use the @font-face rule in your embedded style sheet. First we will get the font location and loop to read one font at a time to generate the @font-face code in the head section and then we will loop one more time to create the code, this time for the anchor or paragraph tags inside the body of the web page.
The script below combines both steps to dynamically produce the list of all installed fonts on your Linux system in a web page.
INSTALLATION OF THE SCRIPT
GUI
2.Change the first 2 lines of the script for font directory and the browser string
3.With a file manager like ROX-filer, right-click on the gen-fonts.sh file, and check the 3 boxes at the end to make all 3 executable
4.Click on the script to generate and view the list of installed fonts in your system.
COMMAND LINE
2.Change the first 2 lines of the script for font directory and the browser string
3.Open up a terminal and type cd /tmp; chmod 755 gen-fonts.sh
4.Type ./gen-fonts.sh to run and view the installed fonts in a html file
ADAPTING THE SCRIPT FOR USE IN WEBSITES ONLINE
- First, copy your font files to a directory on your server, such as public-html/fonts or www/fonts, both of which point to the same location.
- Second, taking the code below as a sample , create @font-face rules for every font in the style block of the header. Eg.
<head><style>
@font-face {font-family:'Bigfish'; src:url('fonts/Bigfish.ttf'); }
</style></head>
- To end, put your text within tags such as "a" or "p" in the body. Eg.
<a class="btxt" href="">List Of Installed Fonts On Your Linux System</a>
Simple sample page using @font-face for your website page
<html>
<head>
<style>
@font-face {font-family:'Bigfish'; src:url('fonts/Bigfish.ttf'); }
.btxt {font-family:'Bigfish'; font-size:15px; }
</style>
</head>
<body>
<a class="btxt">List Of Installed Fonts On Your Linux System</a>
</body>
</html>
When we use fonts this way on the server hosting our website,
everyone will see the same font on their laptop or pc even if they don't have this font installed. The only requirement is that their browsers must support the @font-face rule.
Typing the following command helps create a sorted display of available fonts
 |
| Sample wordart-Font3d |
HAVE YOU DOWNLOADED MY THREE FREE FONT PROGRAMS YET????
I have created four free font tools, three of which are free downloads. These three come with install and uninstall scripts that
can be used for viewing the installed fonts on your Windows laptop or pc and also
to view your text in all installed fonts and generate 3d wordart. Take a minute
to read about these at
sqlhtm.com. The fourth is an online web application. Watch the
slideshow
and play with the 4th tool online at sqlhtm.com!
These are sure to be great additions to your toolset for online and offline web or other
projects.


1.
MyFontYourFont
Reads all your installed fonts on Windows and generates and shows sample text in
horizontal and vertical formats in various sizes.

2.
MyFontYourFontHot
Reads your text and displays them with all installed fonts so you can
select the best-looking one for your blog or website article.

3.
Font3dRandom
This is one of my bigger font projects which lets you create
3d html oneliner wordart with a totally endless variety of font and
color combinations.

4.
Font3dTemplates
This one's my biggest effort on 3dfont wordart program till date.
The first version which is an online basic version creates
simple wordart with installed regular and other floral
and decorative fonts on Windows XP. When the regular fonts we use in everyday
life or magnified, colored and shaded, we see MAGIC! Even fonts with your portraits or those of the celebrities can be enlarged,
colored and 3d-shaded! It's that simple. The newer version currently
under development has the really cool image and text
drag-n-drop, local storage html5 features among others compared to the
older version.
SOME VALUABLE FONT-RELATED WEBSITES ON THE WEB
After reading this article, optimist said, "Nice read". Pessimist said, "fc-list".
5/12/2013 01:57:00 PM
Jsc Jwhat Jerome Christopher
, Posted in
Browsers
,
Chrome
,
Computers
,
Linux
,
Tips'nTricks
,
Unix
,
Web Tools
,
Windows
,
Windows XP
We all know about "about:blank". Have you ever thought about "about:about"? I didn't, till recently. It's hard to believe, but this is how it happened!
While on a search for finding something humorous about "about:blank", I stumbled on "about:about" and couldn't stop being amazed at how much browser-related information I missed all my life without knowing about it. There can be very few browser-related commands like "about:about". Type it in the address bar in every browser for the ultimate collection of any and every configurable and read-only browser-related parameter, a lot of which we may not find in regular Edit->Preferences. Once I knew about this obscure command, I ran it through the three browsers I have on my laptop and collected text and screenshots of the various options of this powerful command. Other than the Chrome, Firefox and Opera browsers you see in this article, I'm sure every other version of every other browser on every other operating system will have it's own unique implementation of this command.
1. OPERA-11.60 [Linux]

While Chrome and Firefox have links for the various about command options, Opera has only one pageful of important information. Just long static text with a few links but mostly read-only. Here's a quick look at a part of it.
Version information
Version 11.60
Build 1185
Platform Linux
System i686, 2.6.33.2
Browser identification
Opera/9.80 (X11; Linux i686; U; en) Presto/2.10.229 Version/11.60
Paths
Preferences /root/.opera/operaprefs.ini
Saved session /root/.opera/sessions/autopera.win
Bookmarks /root/.opera/bookmarks.adr
Opera directory /root/.opera
Cache /root/.opera/cache
Help documents /root/.opera/opcache
Mail directory /root/.opera/mail
Plug-in path /usr/lib/opera/plugins /usr/lib/mozilla/plugins
User CSS directory /root/.opera/styles/user
Third parties:
...
2. CHROMIUM-12.0 [Linux]
Chromium and Firefox present lists of links for various "about:about" options.
One little thing that attracted my attention is that when you click on options such as "about:flags" or type "about:flags" in the address bar, Chromium changes it to display "chrome://flags" etc. So, don't be alarmed to see this in the address bars of the four screenshots below. This happened only on Chromium and not on Firefox.
- About:flags [Experiments such as for print preview and multiple profiles that can be enabled. Users are strictly warned to proceed at their own risk due to the experimental nature of these options].
- About:memory [I found this to be very interesting. Displays memory allocated to every tab open. I was surprised to find that the summary on top displays memory used not just by the Chromium browser but also other currently-running browsers. [Opera and Firefox you see that I had running].
- About:plugins [Another location to enable/disable plugins other than from Wrench(Settings)->Preferences->Under the hood->Content settings->Plugins->Enable/disable individual plugins].
- About:version [Remember to grab the command line equivalent of however you started Chromium from here for use in your shell scripts].
Some other options I found interesting that are not displayed with images as above:
- About:view-http-cache [Displays cache contents]
- About:credits [Displays webpage and licence links]
- About:dns
- About:histograms
- About:net-internals
3. FIREFOX-13.0 [Linux]
Firefox 13.0 has the highest number of about:about options, a whopping 25! Chromium 12.0 has 18 clickable and 6 non-clickable options. [The non-clickable ones are for debugging only, you have to type them into the address bar every time].
- About:addons [Configurable addons manager to download addons on demand. This panel also has tabs for extentions, themes and plugins].
- About:cache [Displays disk and offline cache device locations and content].
- About:config [Change internal defaults at your own risk. Click twice to change or rightclick for more options. Has so many obscure options that this could be the theme of a whole new article!].
- About:home [Main dashboard. Start here].
- About:permissions [Permissions manager for mozilla and all sites. Manage permissions for passwords, cookies, popups, share location and offline storage].
- About:memory [You can view a neatly-presented memory allocation map for Firefox processes in a tree view].
Some other options not displayed with images as above:
About:plugins [Plugin-related information]
About:buildconfig [Machine/platform/tools builds and versions]
FINAL WORD
Browsers, there are a million but "About:about", there is only one. You don't have to be a digital ninja to try the experimental or debugging options of this command. Everyone can try "about:about" in every browser and start reaping the benefits of read-only and configurable browser parameters! Back to my search for something humorous about "about:blank". At this time, the only funny thing that comes to my mind is to say "He is the inventor of 'about:blank'" about every half-baked, pompous type around! If you find anything funnier, let me know at sqlhtm@sqlhtm.com.
2/27/2013 08:17:00 PM
Jsc Jwhat Jerome Christopher
, Posted in
Errors
,
Linux
,
Puppy Linux
,
Shell Scripts
,
TimeSavers
,
Tips'nTricks
,
Unix
It's Better "Quoted" Than "Naught"ed!
Behold the mighty little ">" symbol in a Unix/Linux grep command. If not quoted, it will empty the file being searched.
EASY EMPTY
If you've been on the Unix/Linux platforms for a while, I am sure that you'll remember this good old technique to empty files.
>test.log
This command nulls out the test.log file and is usually used to empty fat old error files and log files.
THE DANGER OF UNQUOTED ">" WITHIN A GREP COMMAND
While the command above is perfectly fine, accidents do happen especially if and when we are dumb, careless or in a big hurry! That's why we better watch out for the greater than symbol [">"] used carelessly in a grep command. If it is not quoted, it empties the file. Makes it 0 bytes. Zero. Zilch. Nada. Naught. Nothing! What a nightmare! There's no way out except with a backup. It doesn't matter it is a 1KB file or 1GB. There is nothing left in the file so you can try the "string" command or similar. How dangerous!

EXAMPLE
Let us prove this with an example. Look at the image above. We have a test file called hworld1.log and we are going to search for a string "echo hello >" within the file. First look at the file itself.
$cat hworld1.log
#!/bin/sh
#Beware the greater than symbol in a grep command. Always quote it!
touch hello.log
echo hello>hello.log
echo world>>hello.log
ls -l hello.log
exit
CORRECT USAGE OF THE GREP COMMAND
To search for the string "echo hello >" within the hworld1.log file, type
$grep "echo hello >" hworld1.log
and everything is fine. Check the image above.
DANGER! INCORRECT USAGE
Suppose you are in a hurry to go out and you accidentally forget to quote your > symbol in your grep command. Now it is not part of the search string you intend it to be anymore. The grep command looks for part of the search string [echo] in the wrong place [non-existent hello file] and the input file [hworld1.log] is overwritten with null instead! Never try
$grep echo hello > hworld1.log
or else the hworld1.log file is nulled out! Check the image above.
BACKUPS ARE NOT LUXURY-THEY ARE AN ABSOLUTE NECESSITY
It's always top priority to back up anything worthwhile on the pc/laptop regularly. Even with backups, it's never safe to use ">" in a grep command without quotes carelessly! Remember the tiny, little ">" can make a tiny 1KB file or a 1GB monster file empty in a second!
REQUIREMENTS
Tested on Puppy Lucid 510. Puppy Linux allows both single and double quotes within the grep command. Check with your Unix/Linux platform for details on how things work with regard to single or double quotes.

2/11/2013 09:13:00 PM
Jsc Jwhat Jerome Christopher
, Posted in
Browsers
,
Chrome
,
Linux
,
Puppy Linux
,
Shell Scripts
,
Tabs
,
TimeSavers
,
Tips'nTricks
,
Unix
,
Web Tools
Chromium/Firefox/Opera
Puppy Linux Lucid 5.1.0
I Suddenly Tripped On A New Idea!
You know what, I suddenly tripped on an idea to start a whole bunch of sites in a whole bunch of tabs - all at once - using a shell script! Really amazing!
What You May Be Missing
Are you one of the power users? Maximize your productivity by automating repetitive typing! We usually start the browsers manually, and type the addresses every time manually or use bookmarks to open sites-even those sites we can't stop visiting every single day of our lives such as the email sites, the ISPs, the social sites, the movie/tv sites and the devotional sites!
Even if you used a shell script, you may not be opening more than one tab at a time!
Even if some browsers such as the Chromium-browser give you the option to open a bunch of tabs when you open a new tab in the second session after exiting with a bunch of sites in the first, other browsers may not have that feature!
Tiny Oneliner. One-Click Wonder!
Wouldn't it be great to be able to start a bunch of sites in several tabs "at the press of a button" all at once by using a shell script? It is right here. It works in Chromium, Opera and Firefox on Puppy Lucid Linux5.1.0 and it should work with other browsers in other distros too!
The Simple Oneliner Script
multi-tabbed-chromium.sh
/usr/bin/chromium-browser \
"file:///your-favorite-local-file.html" \
"https://yahoo.com" \
"http://blogger.com" \
"http://twitter.com/thatsgoodbusybe" &
The Steps
- Copy the oneliner script above and paste it to a script
- Replace the links with your links
- Run the command below once to change the script to executable
chmod 755 multi-tabbed-chromium.sh
./multi-tabbed-chromium.sh
or click on it from rox or some other file manager to run it!
Now whenever you want to start the "must visit daily" sites, however many, just click on that script to open all sites all at once! Stop wasteful typing every time you get on the net for every site you visit! Start the worry-free one-click fast start with the shell script! Every time!!!

NOTE 1: Browsers And OS's
Works fine on Chromium, Firefox and Opera on Puppy Lucid Linux5.1.0. Change the executable browser name for each browser you want to use. Should work as is or with minimum changes with other browsers and other distros too.
Tip: Use the "which browsername" command [eg. which opera] or a similar command to find the location of the executable. Some browsers may keep executables in locations other than /usr/bin.
NOTE 2: Max Number Of Open Tabs
Number of max open tabs depends on your browser and your OS.
7/22/2012 03:39:00 AM
Jsc Jwhat Jerome Christopher
, Posted in
Browsers
,
Puppy Linux
,
Shell Scripts
,
Sqlhtm Tools
,
Tiny tools
,
Unix
 |
| Linux Html Image Gallery Creator |
Create A "Rightclick-Select-Select" Html Image Gallery For Puppy Lucid51 Linux
[Updated: 23 August, 2013.
Please note that whether you copy/paste code or download the tar file, there is an important step which may not be obvious, and that is to change the browser executable name at the end of the exec script(lh_img_gallery) before running the install script(lh_img_gallery_install.sh). This step is important. Read on.]
Did you know how I used Font3dTemplates to create impressive wordart images for use at my website? Just take a look at the top of my Homepage. While busy with this task, I needed an image gallery to view all images in one page, and came up with this simple image gallery shell script[currently for offline use only].
All you need to do is to [rightclick] on an image directory and select [Open With] first and then select [lh_img_gallery] from the menu to create the image gallery where you can click on individual thumbnails to view them in full size in a new tab. Developed and successfully tested on Puppy Lucid51, this image gallery creator should work well on other linux and unix flavors as is or with minimum modifications [at least Usage 2:CLI described towards the end of this article].
Let me explain briefly what is involved in getting it done.
Start simple. Create the scripts first.
Script 1: The main script
#!/bin/sh
#==============================================================================
#lh_img_gallery - Linux Html Image Gallery Creator
#==============================================================================
#Usage:
#1.GUI: Open Rox file manager, rightclick on a directory with images, select
# [Open With] and then select [lh_img_gallery] to generate the image gallery
# and open it with your browser.
#2.CLI: You can also open a rxvt terminal and type
# /root/my-applications/lh_img_gallery/lh_img_gallery your-image-directory-with-full-path
# to run and view the gallery.
# eg. /root/my-applications/lh_img_gallery/lh_img_gallery /mnt/sda1/TRAV/tmpcd/CMisc
#==============================================================================
#Jerome Christopher
#www.sqlhtm.com
#==============================================================================
dir=$1
cd "$dir"
outfile=/root/my-applications/lh_img_gallery/lh_img_gallery.htm
echo '<html><body><div style="text-align:center;float:left">Linux Html Image Gallery<br>'>$outfile
ls *.jpg *.jpeg *.bmp *.png *.gif|while read pic; do
echo '<a href="'$dir/$pic'"'' target="_blank"''><img src="'$dir/$pic'"
width="100" height="50" border="1"
style="padding-top:2px;padding-bottom:2px;padding-left:2px;padding-right:2px;
margin-top:5px;margin-bottom:5px;margin-left:5px;margin-right:5px;"></a>'
done>>$outfile
echo '</div></body></html>'>>$outfile
chrome "file:///$outfile"
exit |
Note1: Change image types in red to
add/remove image file types.
Note2: Change the thumbnail width and height in blue to
resize thumbnails.
Note3: Change the browser in lightgreen to
open your browser.
Script 2: The install script
#!/bin/sh
#==============================================================================
#lh_img_gallery_install.sh
#Install files at /root/my-applications/lh_img_gallery and make a link for
#lh_img_gallery at /root/.config/rox.sourceforge.net/OpenWith.
#Jerome Christopher
#www.sqlhtm.com
#==============================================================================
(
installdir=/root/my-applications/lh_img_gallery
mkdir $installdir
cp lh_img_gallery $installdir
cp lh_img_gallery_install.sh $installdir
cp lh_img_gallery_uninstall.sh $installdir
cp lh_img_gallery_check.sh $installdir
ln -s $installdir/lh_img_gallery /root/.config/rox.sourceforge.net/OpenWith
)>/tmp/lh_img_gallery_install.out 2>>/tmp/lh_img_gallery_install.out
geany /tmp/lh_img_gallery_install.out
exit
|
Script 3: The uninstall script
#!/bin/sh
#==============================================================================
#lh_img_gallery_uninstall.sh
#Uninstall the lh_img_gallery
#Jerome Christopher
#www.sqlhtm.com
#==============================================================================
(
installdir=/root/my-applications/lh_img_gallery
rm -f $installdir/lh_*
rmdir $installdir
rm -f /root/.config/rox.sourceforge.net/OpenWith/lh_img_gallery
)>/tmp/lh_img_gallery_uninstall.out 2>>/tmp/lh_img_gallery_uninstall.out
geany /tmp/lh_img_gallery_uninstall.out
exit
|
Script 4: The check script
#!/bin/sh
#====================================================
#lh_img_gallery_check.sh
#====================================================
(
ls -l /root/.config/rox.sourceforge.net/OpenWith/lh_*
cd /root/my-applications/lh_*
pwd
ls -l lh_*
ls -l /tmp/lh_img_gallery_install.out
cat /tmp/lh_img_gallery_install.out
ls -l /tmp/lh_img_gallery_uninstall.out
cat /tmp/lh_img_gallery_uninstall.out
)>/tmp/lh_img_gallery_check.out 2>>/tmp/lh_img_gallery_check.out
geany /tmp/lh_img_gallery_check.out
exit
|
Implementation Considerations
I remembered to make these scripts executable and changed permissions appropriately. I also was wondering how to run these easily. Luckily the Rox file manager has the [/root/.config/rox.sourceforge.net/OpenWith] folder configured in a way that will allow me to drop my executable links there. All I needed to do was to create a link for the [lh_img_gallery] script and drop it in the [/root/.config/rox.sourceforge.net/OpenWith] folder. Now I could rightclick on a directory, select [Open With] and then click on [lh_img_gallery] to generate and view the image gallery.


Install and Usage
Install
Method 1: Download tar
1.Download the tar file from sqlhtm.com here.
2.Go to a temporary directory[eg. /tmp] and extract the tar file there to create and copy files to the [/tmp/lh_img_gallery.install] directory.
3.Go to the /tmp/lh_img_gallery.install directory and change the file permissions[chmod 755 lh_*]
[Update:
4.Change the browser executable name (eg. chromium-browser, firefox, opera
etc with path) at the end of the executable script (lh_img_gallery) before
running the install script (lh_img_gallery_install.sh). This is important.]
5.Click on the /tmp/lh_img_gallery.install/lh_img_gallery_install.sh script to install.
6.Click on the /tmp/lh_img_gallery.install/lh_img_gallery_check.sh script to verify install.
Method 2: Copy/Paste
1.Create a test directory [mkdir /tmp/lh_img_gallery.install] and copy and paste all 4 scripts there.
2.Change to the /tmp/lh_img_gallery.install directory, change the file permissions[chmod 755 lh_*].
[Update:
3.Change the browser executable name (eg. chromium-browser, firefox, opera etc with path)
at the end of the executable script (lh_img_gallery) before running the install script
(lh_img_gallery_install.sh). This is important.]
4.Click on lh_img_gallery_install.sh to install.
Remember that the uninstall script will remove the install directory with the 4 scripts, the link, and the output file.
Uninstall
Click on /tmp/lh_img_gallery.install/lh_img_gallery_uninstall.sh to uninstall.
Usage
1.GUI: Open Rox file manager, rightclick on a directory with images, select [Open With] and then select [lh_img_gallery] to generate the image gallery and open it with your browser.
2.CLI: You can also open a rxvt terminal and type
/root/my-applications/lh_img_gallery/lh_img_gallery your-image-directory-with-full-path to run and view the gallery.
eg. /root/my-applications/lh_img_gallery/lh_img_gallery /mnt/sda1/TRAV/tmpcd/CMisc
Final Words
First looks may be deceptive, let's jump up to the top for another look at our Simple Linux Html Image Gallery. Not too bad for a 10-line shell script image gallery creator, I think! How about you?


 7/17/2013 03:00:00 AM
 Jsc Jwhat Jerome Christopher
, Posted in
Browsers
,
Chrome
,
Download This
,
Font Tools
,
Linux
,
Online wordart creator
,
Puppy Linux
,
Sqlhtm Tools
,
Unix
,
Windows XP
Jsc Jwhat Jerome Christopher
, Posted in
Browsers
,
Chrome
,
Download This
,
Font Tools
,
Linux
,
Online wordart creator
,
Puppy Linux
,
Sqlhtm Tools
,
Unix
,
Windows XP